


Linux CentOS7 Nginx[安装&卸载&实战]
1 准备安装环境
准备安装依赖:
[root@nginx-test]# yum install -y gcc pcre pcre-devel openssl openssl-devel gd gd-devel
等依赖安装完成后,下载nginx,可以从官网找到合适的版本:Nginx
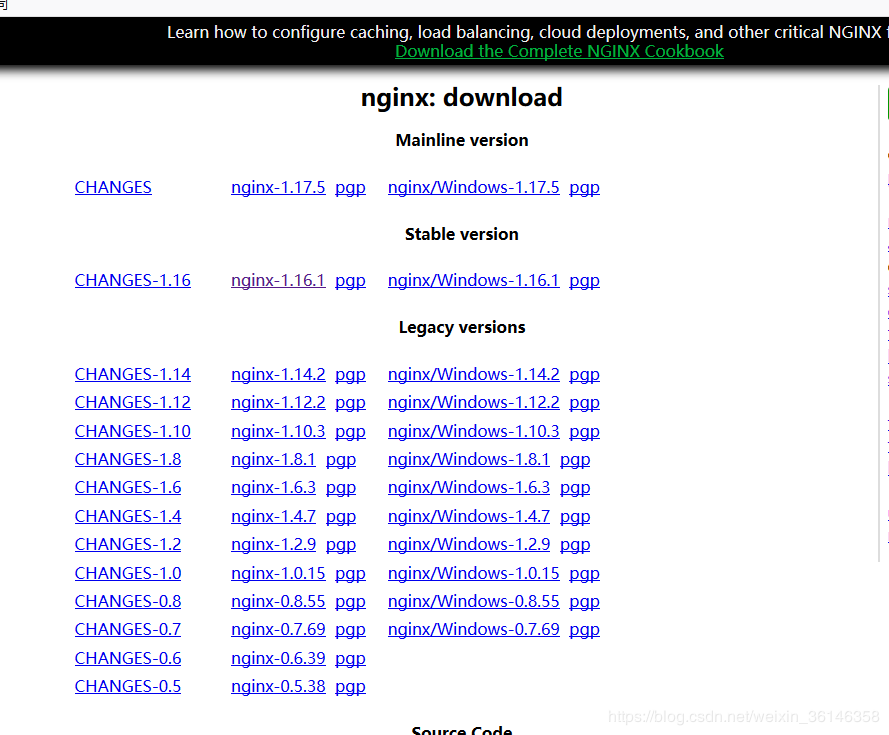
使用wget命令下载nginx-1.16.1.tar.gz源代码编译安装包,使用yum命令安装wget命令。
[root@nginx-test]# wget -c http://nginx.org/download/nginx-1.16.1.tar.gz
解压:
[root@nginx-test]# tar-zxvfnginx-1.16.1.tar.gz
[root@nginx-test]# cd nginx-1.16.1
[root@nginx-test]#
2 开始安装
具体是想默认配置安装还是自定义配置,可自行斟酌。
2.1 默认安装
[root@nginx-test]# ./configure
2.2 配置具体用户和用户组
[root@nginx-test]# ./configure \
--prefix=/usr/local/nginx \
--pid-path=/usr/local/nginx/run \
--user=nginx \
--group=nginx \
--with-http_ssl_module \
--with-http_flv_module \
--with-http_stub_status_module \
--with-http_gzip_static_module \
--with-pcre \
--with-http_image_filter_module \
--with-debug
2.3 解决安装依赖报错
./configure: error: SSL modules require the OpenSSL library.
You can either do not enable the modules, or install the OpenSSL library
into the system, or build the OpenSSL library statically from the source
with nginx by using --with-openssl=<path> option.
[root@nginx-test]# yum -y install openssl openssl-devel
./configure: error: the HTTP rewrite module requires the PCRE library.
You can either disable the module by using --without-http_rewrite_module
option, or install the PCRE library into the system, or build the PCRE library
statically from the source with nginx by using --with-pcre=<path> option.
[root@nginx-test]# yum -y install pcre-devel
./configure: error: the HTTP image filter module requires the GD library.
You can either do not enable the module or install the libraries.

[root@nginx-test]# yum -y install libgd-dev libgd2-xpm-dev
configure: error: You need a C++ compiler for C++ support.
配置:错误:您需要一个c++编译器来支持c++。

[root@nginx-test]# yum -y install gcc-c++
2.4 不依赖用户组
[root@nginx-test]# ./configure \
--prefix=/usr/local/nginx \
--conf-path=/usr/local/nginx/conf/nginx.conf \
--pid-path=/usr/local/nginx/conf/nginx.pid \
--lock-path=/var/lock/nginx.lock \
--error-log-path=/var/log/nginx/error.log \
--http-log-path=/var/log/nginx/access.log \
--with-http_gzip_static_module \
--http-client-body-temp-path=/var/temp/nginx/client \
--http-proxy-temp-path=/var/temp/nginx/proxy \
--http-fastcgi-temp-path=/var/temp/nginx/fastcgi \
--http-uwsgi-temp-path=/var/temp/nginx/uwsgi \
--http-scgi-temp-path=/var/temp/nginx/scgi
2.5 进行安装
[root@nginx-test]# make && make install
然后就是安装成功了!!
3 nginx基本操作
//启动nginx
[root@nginx-test]# /usr/local/nginx/sbin/nginx
//停止nginx
[root@nginx-test]# /usr/local/nginx/sbin/nginx -s stop
[root@nginx-test]# /usr/local/nginx/sbin/nginx -s quit
//重启nginx
[root@nginx-test]# /usr/local/nginx/sbin/nginx -s reload
//检查nginx.conf
[root@nginx-test]# /usr/local/nginx/sbin/nginx -t
//将nginx加入环境变量
[root@nginx-test logs]# vim /etc/profile    #编辑配置文件
[root@nginx-test logs]# source /etc/profile #刷新配置文件
[root@nginx-test logs]# cat /etc/profile    #查看配置文件
export NGINX_HOME="/usr/local/nginx"
export JAVA_HOME="/usr/java/jdk1.8.0_171-amd64"
export PATH=$PATH:$JAVA_HOME/bin:$NGINX_HOME/sbin
//查看nginx进程:
[root@nginx-test]# netstat -tlunp | grep nginx
tcp        000.0.0.0:800.0.0.0:*               LISTEN      17506/nginx: master
[root@nginx-test]# ps -ef | grep nginx
root     175061014:28 ?        00:00:00 nginx: master process /usr/local/nginx/sbin/nginx
nginx    1750717506014:28 ?    00:00:00 nginx: worker process
root     1752210068014:39 pts/ 000:00:00 grep --color=auto nginx
[root@nginx-test]#

4 nginx设置开机启动
在/etc/init.d目录下创建nginx脚本
[root@hk-web-database-pc init.d]# cd /etc/init.d/
[root@hk-web-database-pc init.d]# vim nginx
nginx内容如下:
#!/bin/bash
# nginx Startup script for the Nginx HTTP Server
# it is v.0.0.2 version.
# chkconfig: - 85 15
# description: Nginx is a high-performance web and proxy server.
#              It has a lot of features, but it's not for everyone.
# processname: nginx
# pidfile: /var/run/nginx.pid
# config: /usr/local/nginx/conf/nginx.conf

nginxd="/usr/local/nginx/sbin/nginx"
#nginx启动文件路径
nginx_config="/usr/local/nginx/conf/nginx.conf"
#nginx配置文件路径
nginx_pid="/usr/local/nginx/logs/nginx.pid"
#nginxPID文件

RETVAL=0
prog="nginx"
# Source function library.
. /etc/rc.d/init.d/functions
# Source networking configuration.
. /etc/sysconfig/network
# Check that networking is up.
[ "$NETWORKING" = "no" ] && exit 0
[ -x $nginxd ] || exit 0
# Start nginx daemons functions.
start() {
    if [ -e $nginx_pid ];then
       echo "nginx already running...."
   exit 1
    fi
       echo -n $"Starting $prog: "
       daemon $nginxd -c ${nginx_config}
   RETVAL=$?
   echo
       [ $RETVAL = 0 ] && touch /var/lock/subsys/nginx
   return $RETVAL
}

# Stop nginx daemons functions.
stop() {
    echo -n $"Stopping $prog: "
    killproc $nginxd
    RETVAL=$?
    echo
    [ $RETVAL = 0 ] && rm -f /var/lock/subsys/nginx /usr/local/nginx/logs/nginx.pid
}

# reload nginx service functions.
reload() {
    echo -n $"Reloading $prog: "
    #kill -HUP `cat ${nginx_pid}`
    killproc $nginxd -HUP
    RETVAL=$?
    echo
}

# See how we were called.
    case "$1" in
start)
    start
    ;;
stop)
    stop
    ;;
reload)
    reload
    ;;
restart)
    stop
    start
    ;;
status)
    status $prog
    RETVAL=$?
    ;;
*)
    echo $"Usage: $prog {start|stop|restart|reload|status|help}"
    exit 1
esac
exit $RETVAL
给nginx文件添加执行权限
[root@nginx-test]# chmod +x nginx
添加开机启动
[root@hk-web-database-pc init.d]# chkconfig --add nginx
//添加nginx启动项
[root@hk-web-database-pc init.d]# chkconfig nginx on
//设置nginx开机启动
[root@hk-web-database-pc init.d]# chkconfig --list
//查看启动项
Note: This output shows SysV services only and does not include native
      systemd services. SysV configuration data might be overridden by native
      systemd configuration.

      If you want to list systemd services use 'systemctl list-unit-files'.
      To see services enabled on particular target use
      'systemctl list-dependencies [target]'.

aegis          	0:off	1:off	2:on	3:on	4:on	5:on	6:off
jexec          	0:off	1:on	2:on	3:on	4:on	5:on	6:off
mysqld         	0:off	1:off	2:on	3:on	4:on	5:on	6:off
netconsole     	0:off	1:off	2:off	3:off	4:off	5:off	6:off
network        	0:off	1:off	2:on	3:on	4:on	5:on	6:off
nginx          	0:off	1:off	2:on	3:on	4:on	5:on	6:off
5 FAQ常见问题
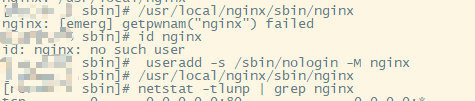
如果在第一次启动的时候遇到 nginx: [emerg] getpwnam(“nginx”) failed这个错误,没有安装nginx用户导致的无法启动,需要添加nginx用户,按下面命令操作即可,然后再次启动即可
[root@nginx-test]# id nginx
id: nginx: no such user
[root@nginx-test]#  useradd -s /sbin/nologin -M nginx
[root@nginx-test]# /usr/local/nginx/sbin/nginx
6 使用systemctl管理Nginx服务
创建/usr/lib/systemd/system/nginx.service配置文件,使用systemctl管理Nginx服务
[root@OtherServer opt]# cat /usr/lib/systemd/system/nginx.service
[Unit]
Description=The nginx HTTP and reverse proxy server
After=network-online.target remote-fs.target nss-lookup.target
Wants=network-online.target

[Service]
Type=forking
PIDFile=/usr/local/nginx/logs/nginx.pid

# Nginx will fail to start if /run/nginx.pid already exists but has the wrong
# SELinux context. This might happen when running `nginx -t` from the cmdline.
# https://bugzilla.redhat.com/show_bug.cgi?id=1268621

ExecStartPre=/usr/local/nginx/sbin/nginx -t -c /usr/local/nginx/conf/nginx.conf
ExecStart=/usr/local/nginx/sbin/nginx -c /usr/local/nginx/conf/nginx.conf
ExecReload=/usr/local/nginx/sbin/nginx -s reload
ExecStop=/usr/local/nginx/sbin/nginx -s stop
ExecQuit=/usr/local/nginx/sbin/nginx -s quit
PrivateTmp = true

[Install]
WantedBy=multi-user.target
systemctl 操作
systemctl start nginx 	 //启动
systemctl stop nginx  	 //停止
systemctl status nginx   //查看状态
systemctl enbale nginx   //启用开机启动
systemctl disable nginx  //禁用开机启动
7 Nginx 卸载
7.1 检查Nginx是否在运行
[root@other-server ~]# ps -ef|grep nginx
root       1162      1  0 Aug29 ?        00:00:00 nginx: master process /usr/local/nginx/sbin/nginx -c /usr/local/nginx/conf/nginx.conf
root       1165   1162  0 Aug29 ?        00:00:00 nginx: worker process
root       1168   1162  0 Aug29 ?        00:00:00 nginx: worker process
root       1170   1162  0 Aug29 ?        00:00:00 nginx: worker process
root       1171   1162  0 Aug29 ?        00:00:00 nginx: worker process
root       2989  93898  0 15:10 pts/4    00:00:00 grep --color=auto nginx
7.2 停止Nginx进程
# systemctl 命令
systemctl stop nginx

# kill -9 命令
## kill -9 主进程
ps -ef|grep nginx|grep -v grep|awk '{ print $2 }'|xargs kill -9

## 再次检查
ps -ef|grep nginx

# nginx命令停止
/usr/local/nginx/sbin/nginx -s stop
7.3 查找Nginx相关文件和目录
[root@other-server ~]# find / -name nginx
/var/log/nginx
/usr/local/sbin/nginx
/usr/local/nginx
/usr/local/nginx/sbin/nginx
7.4 备份Nginx /conf目录中的配置文件
[root@other-server ~]# cd /usr/local/nginx/
[root@other-server ~]# cp -r conf /opt
[root@other-server ~]# ll /opt
drwxr-xr-x  2 root root   20 Aug 17 14:17 api
-rw-r--r--  1 root root 1106 Apr 17 20:48 clear.py
drwxr-xr-x  3 root root 4096 Aug 30 15:22 conf
drwx--x--x  4 root root   28 Aug 16 15:10 containerd
drwxr-xr-x 11 root root  262 Aug 29 17:22 splunk
drwxr-xr-x  2 root root   56 Aug 18 02:50 webhook
7.5 删除Nginx相关配置文件和目录
[root@other-server nginx]# find / -name nginx|xargs rm -rf {}
[root@other-server nginx]# find / -name nginx
find: '/proc/6957': No such file or directory
find: '/proc/6966': No such file or directory
find: '/proc/6967': No such file or directory
find: '/proc/6968': No such file or directory
7.6 补充:检查&删除nginx.service配置文件
[root@other-server ~]# find / -name nginx.service  # 查找nginx.service
/sys/fs/cgroup/memory/system.slice/nginx.service
/sys/fs/cgroup/pids/system.slice/nginx.service
/sys/fs/cgroup/blkio/system.slice/nginx.service
/sys/fs/cgroup/devices/system.slice/nginx.service
/sys/fs/cgroup/cpu,cpuacct/system.slice/nginx.service
/sys/fs/cgroup/systemd/system.slice/nginx.service
/etc/systemd/system/multi-user.target.wants/nginx.service
/etc/systemd/system/nginx.service
[root@other-server ~]# find / -name nginx.service |xargs rm -rf # 查找nginx.service并删除
7.7 补充:检查&删除/etc/init.d/nginx开机自启脚本
[root@other-server ~]# rm -rf /etc/init.d/nginx
7.8 补充:检查/etc/rc.local配置文件是否有添加Nginx开机启动命令
# 检查配置文件内容
[root@other-server ~]# cat /etc/rc.local|grep nginx

# 删除nginx启动配置内容
[root@other-server ~]# vim /etc/rc.local
7.9 使用yum命令安装Nginx可以再用yum指令卸载
[root@other-server ~]# yum remove nginx
8 实战案例
8.1 Nginx 设置反向代理
8.1.1 Nginx 主配置文件
通过nginx设置反向代理,代理到halo博客web服务端口,通过nginx.conf主配置文件加载
host目录下的nginx配置文件。
user                root;
worker_processes    2;
# 工作nginx进程数,根据CPU核心数进行设置。当前创建两个nginx进程。
error_log	        /var/log/nginx/system_error.log info;
# 设置nginx error日志保存路径。
# 错误日志级别:常见的错误日志级别有[debug | info | notice | warn | error | crit | alert | emerg],级别越高记录的信息越少。
# 生产场景一般是 warn | error | crit 这三个级别之一
pid		            /var/log/nginx/nginx.pid;
# nginx pid文件保存路径

events {
	worker_connections		1024;  # 单个工作进程可以允许同时建立外部连接的数量,数字越大能同时处理的连接越多。
}

http {
	include /usr/local/nginx/conf/mime.types;  # 加载/usr/local/nginx/conf/mime.types配置文件
	log_format main '$remote_addr - $remote_user [$time_local] "$request"'  # 设置log_format main access日志格式。
					'$status $body_bytes_sent "$http_referer"'
					'"$http_user_agent" "$http_x_forwarded_for"'
					'"$upstream_response_time" "$request_time"';

	log_format json  '{"@timestamp":"$time_iso8601",'  # 设置log_format json access日志格式
		'"@source":"$server_addr",'
		'"hostname":"$hostname",'
		'"ip":"$http_x_forwarded_for",'
		'"domain":"$server_name",'
		'"referer":"$http_referer",'
		'"request_uri":"$request_uri",'
		'"request":"$request",'
		'"request_method":"$request_method",'
		'"request_time":$request_time,'
		'"request_length":"$request_length",'
		'"args":"$args",'
		'"size":$body_bytes_sent,'
		'"status": $status,'
		'"upstreamtime":"$upstream_response_time",'
		'"upstreamaddr":"$upstream_addr",'
		'"http_user_agent":"$http_user_agent",'
		'"http_cookie":"$http_cookie",'
		'"client": "$remote_addr", '
		'"remote_port": "$remote_port", '
		'"remote_user": "$remote_user", '
		'"scheme":"$scheme",'
		'"server_protocol":"$server_protocol",'
		'"https":"$https"'
		'}';
	access_log  /var/log/nginx/system_access.log json;  # 设置访问日志保存路径和日志类型
	proxy_buffer_size 1024k;
	proxy_buffers 16 1024k;
	proxy_busy_buffers_size 2048k;
	proxy_temp_file_write_size 2048k;
	sendfile	on;
	keepalive_timeout	65;
	server_tokens	off;
	gzip	on;
	include /usr/local/nginx/conf/host/*.conf;  # 加载host目录下的相关配置文件。
}
8.1.2 host/cloud.conf
cloud.example.info域名解析nginx配置文件
server {
	# 监听端
	listen 443 ssl;
	# 匹配的域名 cloud.example.info
	server_name cloud.example.info;
	# 获取$y $m $d变量,设置access日志时添加年月日时间戳
 if ($time_iso8601 ~ "^(\d{4})-(\d{2})-(\d{2})") {
 	set $y $1;
 	set $m $2;
 	set $d $3;
 }
 # 设置access访问日志保存路径
 access_log                /var/log/nginx/apps_access-$y$m$d.log json;       	# 设置access访问日志保存路径
 error_log                 /var/log/nginx/apps_error.log error;              	# 设置error日志保存路径
 ssl_certificate           /etc/letsencrypt/live/example.info/fullchain.pem;    # 设置https访问-证书路径
 ssl_certificate_key       /etc/letsencrypt/live/example.info/privkey.pem;      # 设置https访问-证书私钥路径
 ssl_session_cache         shared:SSL:1m;
 ssl_session_timeout       5m;
 ssl_ciphers               ECDHE-RSA-AES128-GCM-SHA256:ECDHE:ECDH:AES:HIGH:!NULL:!aNULL:!MD5:!ADH:!RC4;
 ssl_protocols             TLSv1.1 TLSv1.2 TLSv1.3;
 ssl_prefer_server_ciphers on;

location / {
     proxy_redirect off;
     proxy_set_header Host $host;
     proxy_set_header X-Real-IP $remote_addr;
     proxy_set_header X-Forwarde-For $proxy_add_x_forwarded_for;
     add_header Content-Security-Policy upgrade-insecure-requests;
     proxy_pass http://127.0.0.1:9445;    # 将请求反向转发到127.0.0.1:9445端口
     client_max_body_size 20000m;         # 如果您要使用本地存储策略,请将下一行注释符删除,并更改大小为理论最大文件尺寸
     }
}
8.2.3 host/blog.conf
example.info www.example.info域名解析nginx配置文件
server {
	listen 443 ssl default;
	# example.info example.info
	server_name www.example.info example.info;
	if ($time_iso8601 ~ "^(\d{4})-(\d{2})-(\d{2})") {
		set $y $1;
		set $m $2;
		set $d $3;
	}
	# log
	access_log           /var/log/nginx/apps_access-$y$m$d.log json;
	error_log            /var/log/nginx/apps_error.log error;
	# HTTPS
	ssl_certificate      /etc/letsencrypt/live/example.info/fullchain.pem;
	ssl_certificate_key	 /etc/letsencrypt/live/example.info/privkey.pem;
	ssl_session_cache    shared:SSL:1m;
	ssl_session_timeout	 5m;
	ssl_ciphers          ECDHE-RSA-AES128-GCM-SHA256:ECDHE:ECDH:AES:HIGH:!NULL:!aNULL:!MD5:!ADH:!RC4;
	ssl_protocols        TLSv1.1 TLSv1.2 TLSv1.3;
	ssl_prefer_server_ciphers on;

location / {
	proxy_redirect off;
	proxy_set_header Host $host;
	proxy_set_header X-Real-IP $remote_addr;
	proxy_set_header X-Forwarde-For $proxy_add_x_forwarded_for;
	add_header Content-Security-Policy upgrade-insecure-requests;
	proxy_pass http://127.0.0.1:9444;
	client_max_body_size 500M;
	}

location /dear {
	root /www;
	index index.html;
	}
}
8.2.4 host/http-to-https.conf
将http请求转成https协议
# http请求转https
server {
	listen  80;
	server_name example.info www.example.info;
	return 301 https://$server_name$request_uri;
	access_log /var/log/nginx/http_to_https.log json;
}
8.2 Nginx + Tomcat集群[实现负载均衡]
8.2.1 环境
CentOS:7.29
nginx:nginx-1.18.0
apache-tomcat:6.0.33
8.2.2 效果流程图

8.2.3 配置文件
nginx.conf 主配置文件
server {
	listen				80;			# 监听端口
	worker_processes	1;			# 工作进程的个数,一般与计算机的cpu核数一致。
	server_name			localhost;	# 匹配的服务域名

events {
    worker_connections  1024;   # 单个进程最大连接数(最大连接数=连接数*进程数)
}
http {
	include       mime.types;   # 文件扩展名与文件类型映射表
	default_type  application/octet-stream; # 默认文件类型
	sendfile      on;
	# 开启高效文件传输模式,sendfile指令指定nginx是否调用sendfile函数来输出文件,对于普通应用设为 on,
	# 如果用来进行下载等应用磁盘IO重负载应用,可设置为off,以平衡磁盘与网络I/O处理速度,降低系统的负载。
	# 注意:如果图片显示不正常把这个改成off。
	keepalive_timeout	65; 		# 长连接超时时间,单位是秒
	gzip				on;			# 启用Gizp压缩
	# 设置log_format json access日志格式。
	log_format json  '{"@timestamp":"$time_iso8601",'
		'"@source":"$server_addr",'
		'"hostname":"$hostname",'
		'"ip":"$http_x_forwarded_for",'
		'"domain":"$server_name",'
		'"referer":"$http_referer",'
		'"request_uri":"$request_uri",'
		'"request":"$request",'
		'"request_method":"$request_method",'
		'"request_time":$request_time,'
		'"request_length":"$request_length",'
		'"args":"$args",'
		'"size":$body_bytes_sent,'
		'"status": $status,'
		'"upstreamtime":"$upstream_response_time",'
		'"upstreamaddr":"$upstream_addr",'
		'"http_user_agent":"$http_user_agent",'
		'"http_cookie":"$http_cookie",'
		'"client": "$remote_addr", '
		'"remote_port": "$remote_port", '
		'"remote_user": "$remote_user", '
		'"scheme":"$scheme",'
		'"server_protocol":"$server_protocol",'
		'"https":"$https"'
		'}';
	# 加载host目录下的相关配置文件。
	include /usr/local/nginx/conf/host/*.conf;
host/tomcat-cluster.conf
# 设置tomcat服务器集群配置
# 服务器集群名字
upstream  tomcat.cluster {
	server    192.168.10.2:8080  weight=1;  # 服务器配置weight是权重的意思,权重越大,分配的概率越大。
	server    192.168.10.3:8080  weight=2;
}
server {
	listen       80;			# 监听80端口,可以改成其他端口
	server_name  localhost;		# 当前服务的域名
    location / {
    	proxy_pass http://tomcat.cluster;
    	proxy_redirect default;
    }
    error_page 500 502 503 504 /50x.html;
    	location = /50x.html {
    	root  html;
    }
}
8.3 传输层 UDP&TCP协议转发和负载均衡
8.3.1 补充:OSI七层协议图
| OSI七层网络模型 | TCP/IP四层概念模型 | 对应网络协议 |
|---|---|---|
| 应用层(Application) | 应用层 | HTTP、TFTP, FTP, NFS, WAIS、SMTP |
| 表示层(Presentation) | 应用层 | Telnet, Rlogin, SNMP, Gopher |
| 会话层(Session) | 应用层 | SMTP, DNS |
| 传输层(Transport) | 传输层 | TCP, UDP |
| 网络层(Network) | 网络层 | IP, ICMP, ARP, RARP, AKP, UUCP |
| 数据链路层(Data Link) | 数据链路层 | FDDI, Ethernet, Arpanet, PDN, SLIP, PPP |
| 物理层(Physical) | 数据链路层 | IEEE 802.1A, IEEE 802.2到IEEE 802.11 |
8.3.2 言归正传:nginx.conf配置文件
安装的nginx版本需要有ngx_stream_core_module模块,才能实现UDP和TCP协议转发。
stream nginx.conf主配置文件,加载514.conf配置文件。stream { # 需要与http同一级 log_format basic 'time=[$time_local] remote_addr=$remote_addr ' # 设置basic日志格式 'protocol=$protocol ' 'status=$status ' 'bytes_sent=$bytes_sent ' 'bytes_received=$bytes_received ' 'session_time=$session_time' include /usr/local/nginx/conf/stream/*.conf; # 加载udp.d目录下的配置文件 }
8.3.3 514.conf
TCP/UDP协议 514 端口转发 配置文件 实现514端口数据流量负载均衡
upstream udp_514_server {
    # 希负载均衡策略可以通过客户端 IP($remote_addr)实现简单的会话保持,其可将同一IP客户端始终转发给同一台后端服务器。
    hash $remote_addr;
    server 10.10.0.102:514 weight=5;
    server 10.10.0.103:514 weight=5;
    # weight 权重值
    # udp不建议添加<max_fails>和<fail_timeout>参数
}

upstream tcp_514_server {
    # 希负载均衡策略可以通过客户端 IP($remote_addr)实现简单的会话保持,其可将同一IP客户端始终转发给同一台后端服务器。
    hash $remote_addr;
    server 10.10.0.102:514 weight=5 max_fails=3 fail_timeout=30s;
    server 10.10.0.103:514 weight=5 max_fails=3 fail_timeout=30s;
    # weight 权重值
    # max_fails:在服务器被标记为不可用的时间内必须发生的失败尝试次数(默认为1次尝试)
    # fail_timeout:多次尝试失败而将服务器标记为不可用的时间,以及将服务器标记为不可用的时间(默认为10秒)
    # udp不建议添加<max_fails>和<fail_timeout>参数
}

# udp 514 端口代理
server {
    listen 514 udp;                                 # 监听udp 514端口
    proxy_timeout           1s;                     # 获取被代理服务器的响应最大超时时间为1s
    proxy_connect_timeout   1s;                     # 与被代理服务器建立连接的超时时间为1s
    access_log              /var/log/nginx/udp_514_server.log  basic;
    error_log               /var/log/nginx/udp_error_514_server.log;
    proxy_pass              udp_514_server;         # 代理upstream名称
}

# tcp 514 端口代理
server {
    listen 514;                                         # 监听tcp 514端口
    proxy_timeout               1s;                     # 获取被代理服务器的响应最大超时时间为1s
    proxy_connect_timeout       1s;                     # 与被代理服务器建立连接的超时时间为1s
    proxy_next_upstream         on;                     # 当被代理的服务器返回错误或超时时,将未返回响应的客户端连接请求传递给upstream中的下一个服务器
    proxy_next_upstream_tries   3;                      # 转发尝试请求最多3次
    proxy_next_upstream_timeout 10s;                    # 总尝试超时时间为10s
    proxy_socket_keepalive      on;                     # 开启SO_KEEPALIVE选项进行心跳检测
    access_log                  /var/log/nginx/tcp_514_server.log  basic;
    error_log                   /var/log/nginx/tcp_error_514_server.log;
    proxy_pass                  tcp_514_server;         # 代理upstream名称
}
-d2979772834f4346a961b123d2a49447.jpg)


评论区