


Let'sEncrypt 免费ssl证书申请并自动续期
Let’sEncrypt是一家免费开放的证书颁发机构,支持申请泛域名证书,不过证书有效期仅有3个月,所以为了避免频繁申请证书,我们可以用脚本实现自动续期,目前我测试过三种方式,均成功续期,在此记录下过程。
前提:获取key&Secret
参考:https://github.com/Neilpang/acme.sh/blob/master/dnsapi/README.md
0x00 acme自动续期
# 安装acme
curl https://get.acme.sh | sh
wget -O -  https://get.acme.sh | sh
# 查看acme版本
acme.sh --version
# 请填写实际key&Secret
export Ali_Key="4xvxbCThnjerg955"
export Ali_Secret="fwyhkkp0"
# 申请证书
acme.sh --issue --dns dns_ali -d *.peakchao.com
# 更新证书
acme.sh --renew -d '*.peakchao.com' --force
# 查看证书列表
acme.sh --list
# 删除证书
acme.sh remove <SAN_Domains>

# 升级 acme.sh 到最新版:
acme.sh --upgrade
# 开启自动升级:
acme.sh  --upgrade  --auto-upgrade
# 关闭自动更新:
acme.sh --upgrade  --auto-upgrade  0

# 以下命令无需执行,据查看,acme会自动添加续期的定时任务
crontab -e
# 添加如下的任务:三个月执行一次
0 0 29 */3 * acme.sh --renew -d '*.peakchao.com' --force
# 最后请不要忘记修改nginx配置以及重启
输出
[root@izf9t76wjp0zs8z ~]# wget -O -  https://get.acme.sh | sh
--2019-03-09 15:17:22--  https://get.acme.sh/
Resolving get.acme.sh (get.acme.sh)... 144.217.161.63, 2607:5300:201:3100::5663
Connecting to get.acme.sh (get.acme.sh)|144.217.161.63|:443... connected.
HTTP request sent, awaiting response... 200 OK
Length: 705 [text/plain]
Saving to: ‘STDOUT’

100%[===========================================================================================================>] 705         --.-K/s   in 0s

2019-03-09 15:17:24 (176 MB/s) - written to stdout [705/705]

  % Total    % Received % Xferd  Average Speed   Time    Time     Time  Current
                                 Dload  Upload   Total   Spent    Left  Speed
100  171k  100  171k    0     0  10938      0  0:00:16  0:00:16 --:--:-- 45873
[Sat Mar  9 15:17:40 CST 2019] Installing from online archive.
[Sat Mar  9 15:17:40 CST 2019] Downloading https://github.com/Neilpang/acme.sh/archive/master.tar.gz
[Sat Mar  9 15:17:46 CST 2019] Extracting master.tar.gz
[Sat Mar  9 15:17:46 CST 2019] It is recommended to install socat first.
[Sat Mar  9 15:17:46 CST 2019] We use socat for standalone server if you use standalone mode.
[Sat Mar  9 15:17:46 CST 2019] If you don't use standalone mode, just ignore this warning.
[Sat Mar  9 15:17:46 CST 2019] Installing to /usr/local/acme.sh
[Sat Mar  9 15:17:46 CST 2019] Installed to /usr/local/acme.sh/acme.sh
[Sat Mar  9 15:17:46 CST 2019] Installing alias to '/root/.bashrc'
[Sat Mar  9 15:17:46 CST 2019] OK, Close and reopen your terminal to start using acme.sh
[Sat Mar  9 15:17:46 CST 2019] Installing alias to '/root/.cshrc'
[Sat Mar  9 15:17:46 CST 2019] Installing alias to '/root/.tcshrc'
[Sat Mar  9 15:17:46 CST 2019] Installing cron job
57 0 * * * "/usr/local/acme.sh"/acme.sh --cron --home "/usr/local/acme.sh" > /dev/null
[Sat Mar  9 15:17:46 CST 2019] Good, bash is found, so change the shebang to use bash as preferred.
[Sat Mar  9 15:17:46 CST 2019] OK
[Sat Mar  9 15:17:46 CST 2019] Install success!
[root@izf9t76wjp0zs8z ~]# export Ali_Key="4xvxbCThnjerg955"
[root@izf9t76wjp0zs8z ~]# export Ali_Secret="fwyhkkp0"
[root@izf9t76wjp0zs8z ~]# acme.sh --issue --dns dns_ali -d *.peakchao.com
[Sat Mar  9 15:19:42 CST 2019] Creating domain key
[Sat Mar  9 15:19:43 CST 2019] The domain key is here: /usr/local/nginx/conf/ssl/*.peakchao.com/*.peakchao.com.key
[Sat Mar  9 15:19:43 CST 2019] Single domain='*.peakchao.com'
[Sat Mar  9 15:19:43 CST 2019] Getting domain auth token for each domain
[Sat Mar  9 15:19:46 CST 2019] Getting webroot for domain='*.peakchao.com'
[Sat Mar  9 15:19:46 CST 2019] Found domain api file: /usr/local/acme.sh/dnsapi/dns_ali.sh
[Sat Mar  9 15:19:49 CST 2019] Let's check each dns records now. Sleep 20 seconds first.
[Sat Mar  9 15:20:10 CST 2019] Checking peakchao.com for _acme-challenge.peakchao.com
[Sat Mar  9 15:20:11 CST 2019] Domain peakchao.com '_acme-challenge.peakchao.com' success.
[Sat Mar  9 15:20:11 CST 2019] All success, let's return
[Sat Mar  9 15:20:11 CST 2019] Verifying: *.peakchao.com
[Sat Mar  9 15:20:15 CST 2019] Success
[Sat Mar  9 15:20:15 CST 2019] Removing DNS records.
[Sat Mar  9 15:20:19 CST 2019] Verify finished, start to sign.
[Sat Mar  9 15:20:19 CST 2019] Lets finalize the order, Le_OrderFinalize: https://acme-v02.api.letsencrypt.org/acme/finalize/48893963/348010849
[Sat Mar  9 15:20:21 CST 2019] Download cert, Le_LinkCert: https://acme-v02.api.letsencrypt.org/acme/cert/0325e2883ade3b454bcf95c37c112b884689
[Sat Mar  9 15:20:23 CST 2019] Cert success.
-----BEGIN CERTIFICATE-----
MIIFVTCCBD2gAwIBAgISAyXiiDreO0VLz5XDfBEriEaJMA0GCSqGSIb3DQEBCwUA
MEoxCzAJBgNVBAYTAlVTMRYwFAYDVQQKEw1MZXQncyBFbmNyeXB0MSMwIQYDVQQD
ExpMZXQncyBFbmNyeXB0IEF1dGhvcml0eSBYMzAeFw0xOTAzMDkwNjIwMjBaFw0x
OTA2MDcwNjIwMjBaMBkxFzAVBgNVBAMMDioucGVha2NoYW8uY29tMIIBIjANBgkq
hkiG9w0BAQEFAAOCAQ8A
-----END CERTIFICATE-----
[Sat Mar  9 15:20:23 CST 2019] Your cert is in  /usr/local/nginx/conf/ssl/*.peakchao.com/*.peakchao.com.cer
[Sat Mar  9 15:20:23 CST 2019] Your cert key is in  /usr/local/nginx/conf/ssl/*.peakchao.com/*.peakchao.com.key
[Sat Mar  9 15:20:23 CST 2019] The intermediate CA cert is in  /usr/local/nginx/conf/ssl/*.peakchao.com/ca.cer
[Sat Mar  9 15:20:23 CST 2019] And the full chain certs is there:  /usr/local/nginx/conf/ssl/*.peakchao.com/fullchain.cer
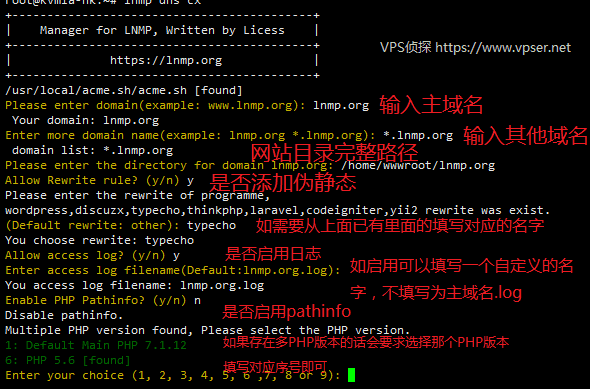
0x01 lnmp自动续期
# 请填写实际key&Secret
export Ali_Key="4xvxbCThnjerg955"
export Ali_Secret="fwyhkkp0"
# 执行此命令后按下图配置
lnmp dnsssl ali 或 lnmp dns ali
# 最后请不要忘记修改nginx配置以及重启
0x02 使用certbot-auto
certbot-auto 已经不能用了,需要使用certbot申请证书
访问 certbot 网站,地址为:https://certbot.eff.org/
在首页选择好 webserver 和 系统类型,则会显示对应的操作步骤。按照步骤逐步操作,如无意外则可完成。
注意:如服务器已启用了 https 服务,则先停止它。certbot-auto 在作验证时会使用 433 端口。
#下载 certbot-auto
wget https://dl.eff.org/certbot-auto
chmod a+x certbot-auto
#执行自动安装,该命令会尝试自动配置 nginx ,你也可以使用下条命令只生成适合 nginx 使用的证书,然后手动配置 nginx
./certbot-auto --nginx
#生成适合 nginx 使用的证书
certbot-auto --nginx certonly
#生成成功后,可以查看证书状态
./certbot-auto certificates
#测试自动更新
./certbot-auto renew --dry-run
#执行自动更新
service nginx stop
certbot-auto renew
service nginx start
#查看证书状态
./certbot-auto certificates
0x03 使用certbot申请泛域名
Skipping bootstrap because certbot-auto is deprecated on this system.
Your system is not supported by certbot-auto anymore.
Certbot cannot be installed.
Please visit https://certbot.eff.org/ to check for other alternatives.
certbot-auto不再被支持,后续使用certbot代替。
1 安装Linux snapd依赖
参考链接:https://snapcraft.io/docs/installing-snap-on-centos
添加epel存储库
sudo yum install epel-release
安装snapd
sudo yum install snapd
启动
$ sudo systemctl enable --now snapd.socket
创建软连接
$ sudo ln -s /var/lib/snapd/snap /snap
2 使用snap安装certbot所需的依赖
sudo snap install core; sudo snap refresh core
3 Remove certbot-auto and any Certbot OS packages
(删除Certbot -auto和任何Certbot操作系统包)
If you have any Certbot packages installed using an OS package manager like
apt,dnf, oryum, you should remove them before installing the Certbot snap to ensure that when you run the commandcertbotthe snap is used rather than the installation from your OS package manager. The exact command to do this depends on your OS, but common examples aresudo apt-get remove certbot,sudo dnf remove certbot, orsudo yum remove certbot. If you previously used Certbot through the certbot-auto script, you should also remove its installation by following the instructions here.
4 安装certbot
sudo snap install --classic certbot
5 创建certbot 命令软连接
sudo ln -s /snap/bin/certbot /usr/bin/certbot
6 申请证书
申请证书,设置多个域名*.hesc.info和hesc.info
certonly --子命令,申请证书
renew --子命令,证书续签
delete --子命令,删除证书
--preferred-challenges=dns --选项,设置模式为dns
--email=mr.hesc@qq.com --选项,设置邮箱
-d=*.hesc.info --选项,设置邮箱
--manual --选项,什么模式
--server --选项,设置api地址
sudo certbot certonly --preferred-challenges=dns --email=mr.hesc@qq.com -d=*.hesc.info -d=hesc.info --manual --server https://acme-v02.api.letsencrypt.org/directory
7 更新证书
sudo crontab -l
0 0 */2 * * certbot renew -q
使用certbot renew命令更新证书,无法续签通配符证书,需要使用manual-auth-hook参数续签证书。
0x04 使用certbot-letencrypt-wildcardcertificates-alydns-au申请续签通配符证书
1 功能
使用 certbot 工具,为不能自动给 letencrypt 通配符证书自动续期(renew)而烦恼吗?这个工具能够帮忙!
不管是申请还是续期,只要是通配符证书,只能采用 dns-01 的方式校验申请者的域名,也就是说 certbot 操作者必须手动添加 DNS TXT 记录。
如果你编写一个 Cron (比如 1 1 */1 * * root certbot-auto renew),自动 renew 通配符证书,此时 Cron 无法自动添加 TXT 记录,这样 renew 操作就会失败,如何解决?
certbot 提供了一个 hook,可以编写一个 Shell 脚本,让脚本调用 DNS 服务商的 API 接口,动态添加 TXT 记录,这样就无需人工干预了。
在 certbot 官方提供的插件和 hook 例子中,都没有针对国内 DNS 服务器的样例,所以我编写了这样一个工具,目前支持阿里云 DNS、腾讯云 DNS、华为云 NDS、GoDaddy(certbot 官方没有对应的插件)。
近期合并了几个PR,没有测试,有问题反馈给我,谢谢!
2 自动申请通配符证书
下载
$ git clone https://github.com/ywdblog/certbot-letencrypt-wildcardcertificates-alydns-au
$ cd certbot-letencrypt-wildcardcertificates-alydns-au
$ chmod 0777 au.sh
配置
- domain.ini
如果domain.ini文件没有你的根域名,请自行添加。
- DNS API 密钥:
这个 API 密钥什么意思呢?由于需要通过 API 操作阿里云 DNS, 腾讯云 DNS 的记录,所以需要去域名服务商哪儿获取 API 密钥,然后配置在 au.sh 文件中:
- ALY_KEY 和 ALY_TOKEN:阿里云 API key 和 Secrec 官方申请文档。
- TXY_KEY 和 TXY_TOKEN:腾讯云 API 密钥官方申请文档。
- HWY_KEY 和 HWY_TOKEN: 华为云 API 密钥官方申请文档
- GODADDY_KEY 和 GODADDY_TOKEN:GoDaddy API 密钥官方申请文档。
- 选择运行环境
目前该工具支持五种运行环境和场景,通过 hook 文件和参数来调用:
- PHP(>4以上版本均可)
- au.sh php aly add/clean:PHP操作阿里云DNS,增加/清空DNS。
- au.sh php txy add/clean:PHP操作腾讯云DNS,增加/清空DNS。
- au.sh php godaddy add/clean:PHP操作GoDaddy DNS,增加/清空DNS。
- Python(支持2.7和3.7,无需任何第三方库)
- au.sh python aly add/clean:Python操作阿里云DNS,增加/清空DNS。
- au.sh python txy add/clean:Python操作腾讯云DNS,增加/清空DNS。
- au.sh python hwy add/clean:Python操作华为云DNS,增加/清空DNS。
- au.sh python godaddy add/clean:Python操作GoDaddy DNS,增加/清空DNS。
根据自己服务器环境和域名服务商选择任意一个 hook shell(包含相应参数),具体使用见下面。
申请证书
测试是否有错误
$ certbot certonly -d *.example.com --manual --preferred-challenges dns --dry-run --manual-auth-hook "/脚本目录/au.sh php aly add" --manual-cleanup-hook "/脚本目录/au.sh php aly clean"
Debug: 操作DNS API可能会遇到一系列问题,比如API token权限不足,遇到相关问题,可以查看 /var/log/certd.log。
重要解释: --manual-auth-hook 和 --manual-cleanup-hook 有三个参数:
- 第一个代表你要选择那种语言(php/python)
- 第二个参数代表你的DNS厂商(aly/txy)
- 第三个参数是固定的(--manual-auth-hook中用add,--manual-clean-hook中用clean)
比如你要选择Python环境,可以将 --manual-auth-hook 输入修改为 "/脚本目录/au.sh python aly add",--manual-cleanup-hook 输入修改为 "/脚本目录/au.sh python aly clean"
确认无误后,实际运行(去除 --dry-run 参数):
# 实际申请

$ certbot certonly  -d *.example.com --manual --preferred-challenges dns --manual-auth-hook "/脚本目录/au.sh php aly add" --manual-cleanup-hook "/脚本目录/au.sh php aly clean"
参数解释(可以不用关心):
- certonly:表示采用验证模式,只会获取证书,不会为web服务器配置证书
- --manual:表示插件
- --preferred-challenges dns:表示采用DNS验证申请者合法性(是不是域名的管理者)
- --dry-run:在实际申请/更新证书前进行测试,强烈推荐
- -d:表示需要为那个域名申请证书,可以有多个。
- --manual-auth-hook:在执行命令的时候调用一个 hook 文件
- --manual-cleanup-hook:清除 DNS 添加的记录
如果你想为多个域名申请通配符证书(合并在一张证书中,也叫做 SAN 通配符证书),直接输入多个 -d 参数即可,比如:
$ certbot certonly -d *.example.com -d *.example.org -d www.example.cn --manual --preferred-challenges dns --dry-run --manual-auth-hook "/脚本目录/au.sh php aly add" --manual-cleanup-hook "/脚本目录/au.sh php aly clean"
3 续期证书
-
对机器上所有证书 renew
$ certbot renew --manual --preferred-challenges dns --manual-auth-hook "/脚本目录/au.sh php aly add" --manual-cleanup-hook "/脚本目录/au.sh php aly clean" -
对某一张证书进行续期
先看看机器上有多少证书:
$ ./certbot certificates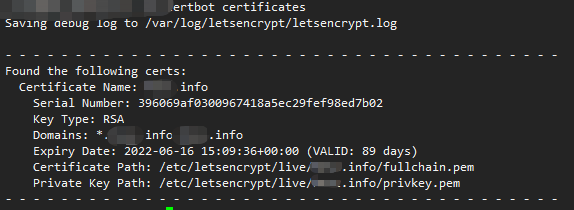
记住证书名,比如 simplehttps.com,然后运行下列命令 renew:
$ certbot renew --cert-name simplehttps.com --manual-auth-hook "/脚本目录/au.sh php aly add" --manual-cleanup-hook "/脚本目录/au.sh php aly clean"
4 加入 crontab
编辑文件 /etc/crontab :
# 证书有效期<30天才会renew,所以crontab可以配置为1天或1周
1 1 */1 * * root certbot-auto renew --manual --preferred-challenges dns  --manual-auth-hook "/脚本目录/au.sh php aly add" --manual-cleanup-hook "/脚本目录/au.sh php aly clean"
如果是certbot 机器和运行web服务(比如 nginx,apache)的机器是同一台,那么成功renew证书后,可以启动对应的web 服务器,运行下列crontab :
# 注意只有成功renew证书,才会重新启动nginx
1 1 */1 * * root certbot-auto renew --manual --preferred-challenges dns --deploy-hook  "service nginx restart" --manual-auth-hook "/脚本目录/au.sh php aly add" --manual-cleanup-hook "/脚本目录/au.sh php aly clean"
注意:只有单机建议这样运行,如果要将证书同步到多台web服务器,需要有别的方案,目前在开发中,主要目的就是同步证书到集群服务器上
-d2979772834f4346a961b123d2a49447.jpg)


评论区