


Splunk Index集群部署
准备工作
检查防火墙
查看防火墙状态
  [root@splunk_master opt]# systemctl status firewalld
  ● firewalld.service - firewalld - dynamic firewall daemon
   Loaded: loaded (/usr/lib/systemd/system/firewalld.service; disabled; vendor preset: enabled)
   Active: inactive (dead)
     Docs: man:firewalld(1)
  [root@splunk_master opt]# systemctl start firewalld //启动防火墙
  [root@splunk_master opt]# systemctl status firewalld
  ● firewalld.service - firewalld - dynamic firewall daemon
   Loaded: loaded (/usr/lib/systemd/system/firewalld.service; disabled; vendor preset: enabled)
   Active: active (running) since Wed 2022-05-04 13:11:27 EDT; 2s ago
     Docs: man:firewalld(1)
   Main PID: 1599 (firewalld)
   CGroup: /system.slice/firewalld.service
           └─1599 /usr/bin/python2 -Es /usr/sbin/firewalld --nofork --nopid
  May 04 13:11:27 splunk_master systemd[1]: Starting firewalld - dynamic firewall daemon...
  May 04 13:11:27 splunk_master systemd[1]: Started firewalld - dynamic firewall daemon.
  May 04 13:11:27 splunk_master firewalld[1599]: WARNING: AllowZoneDrifting is enabled. This is considered an insecure configuration option. It will be removed in a future release. Please consider disabling it now.
  [root@splunk_master opt]#
添加防火墙Splunk策略
# Master
firewall-cmd --zone=public --add-port=8000/tcp --add-port=8089/tcp --permanent
# Index
firewall-cmd --zone=public --add-port=9997/tcp --add-port=8089/tcp --add-port=9887/tcp --permanent
# Search Head
firewall-cmd --zone=public --add-port=8089/tcp --add-port=34567/tcp --permanent

firewall-cmd --reload    # 防火墙配置重新加载
firewall-cmd --list-port # 显示启用的端口

Index
[root@splunk_master opt]#
success # 开启9997 8089 9887端口
[root@splunk_master opt]# firewall-cmd --reload
success # 防火墙配置重新加载
[root@splunk_master opt]# firewall-cmd --list-port
9997/tcp 8089/tcp 9887/tcp # 显示启用的端口
[root@splunk_master opt]#
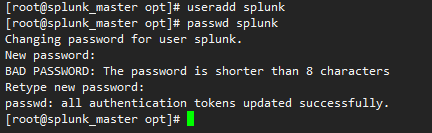
创建用户(splunk)
[root@splunk_master opt]# useradd splunk # 创建splun用户
[root@splunk_master opt]# passwd splunk # 设置splunk用户密码
Changing password for user splunk.
New password:
BAD PASSWORD: The password is shorter than 8 characters
Retype new password:
passwd: all authentication tokens updated successfully.
Splunk index服务器磁盘挂载(检查存储)
注意事项:此步骤只需要在splunk index服务器上操作,SearchHead/Heavy Forward/Master服务器上不需要操作!!!
说明:index服务器磁盘分为SSD和HDD两种,SSD磁盘作为热温数据保存桶及splunk_db。HDD磁盘作为冷数据保存桶及splunk_colddb
创建/splunk_db、/splunk_colddb目录
mkdir /splunk_db
mkdir /splunk_colddb
ll /splunk*

挂载vdc磁盘(ssd)到/splunk_db
查看磁盘信息
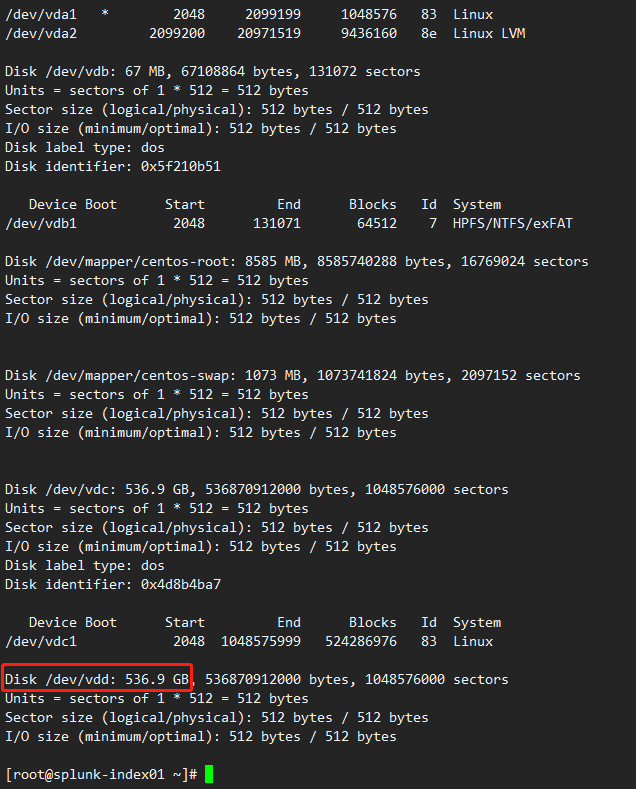
[root@splunk-index01 ~]# fdisk –l
......
Disk /dev/vdc: 536.9 GB, 536870912000 bytes, 1048576000 sectors
Units = sectors of 1 * 512 = 512 bytes
Sector size (logical/physical): 512 bytes / 512 bytes
I/O size (minimum/optimal): 512 bytes / 512 bytes


Disk /dev/vdd: 536.9 GB, 536870912000 bytes, 1048576000 sectors
Units = sectors of 1 * 512 = 512 bytes
Sector size (logical/physical): 512 bytes / 512 bytes
I/O size (minimum/optimal): 512 bytes / 512 bytes
[root@splunk-index01 ~]#
vdc磁盘为SSD磁盘,vdd为hdd磁盘。

给vdc磁盘创建vdc1分区
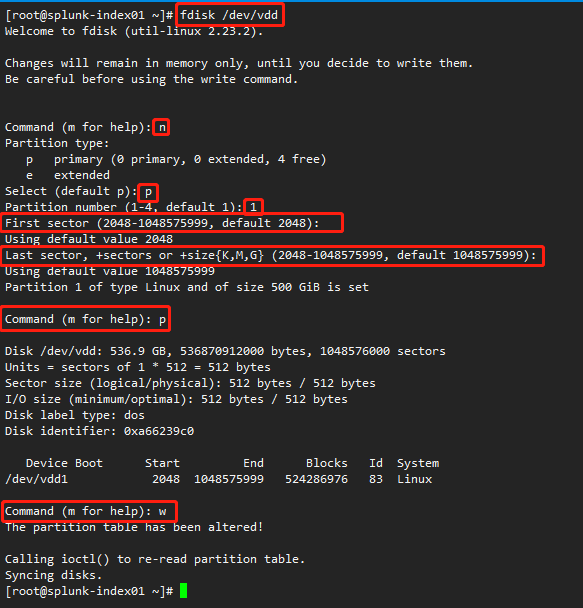
[root@splunk-index01 ~]# fdisk /dev/vdc  # 开始给/dev/vdc设置分区
Welcome to fdisk (util-linux 2.23.2).

Changes will remain in memory only, until you decide to write them.
Be careful before using the write command.
Device does not contain a recognized partition table
Building a new DOS disklabel with disk identifier 0x4d8b4ba7.
Command (m for help): n # 新建磁盘分区
Partition type: p
primary (0 primary, 0 extended, 4 free)
e extended
Select (default p): p # 添加主分区
Partition number (1-4, default 1): 1 # 设置分区号
First sector (2048-1048575999, default 2048): # 设置分区起始大小,默认一直回车
Using default value 2048
Last sector, +sectors or +size{K,M,G} (2048-1048575999, default 1048575999): # 设置分区结束大小,默认一直回车

Using default value 1048575999
Partition 1 of type Linux and of size 500 GiB is set

Command (m for help): p # 显示分区信息

Disk /dev/vdc: 536.9 GB, 536870912000 bytes, 1048576000 sectors
Units = sectors of 1 * 512 = 512 bytes
Sector size (logical/physical): 512 bytes / 512 bytes
I/O size (minimum/optimal): 512 bytes / 512 bytes
Disk label type: dos
Disk identifier: 0x4d8b4ba7

Device Boot    Start    End       Blocks  Id    System

/dev/vdc1       2048    1048575999    524286976   83    Linux

Command (m for help): w # 保存分区信息并退出
The partition table has been altered!
Calling ioctl() to re-read partition table.
Syncing disks.
[root@splunk-index01 ~]#

查看新区,会生产一个/dev/sdb1的新分区
fdisk -l

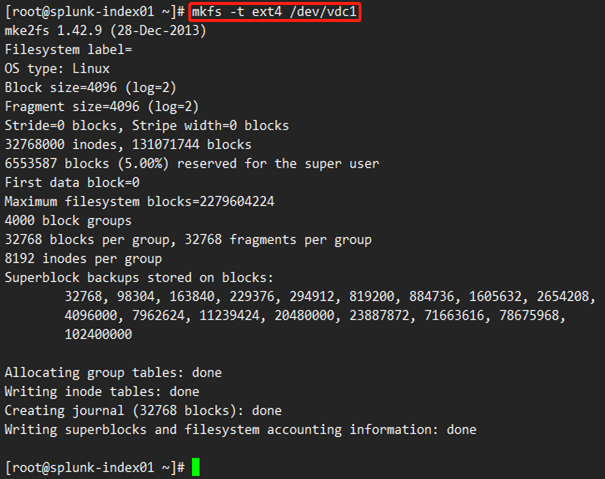
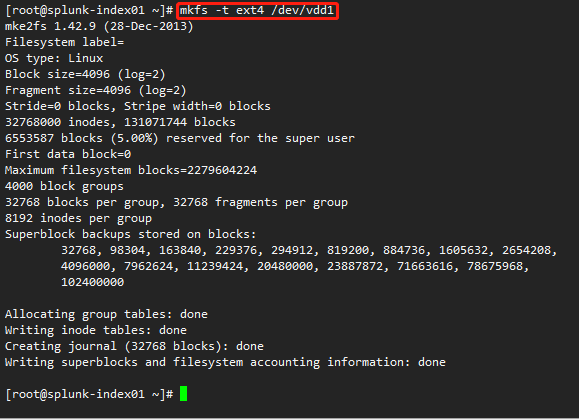
对新建磁盘分区进行格式化,分区类型为“ext4”
mkfs -t ext4 /dev/vdc1
挂载vdc磁盘,并设置开机自动挂载
[root@splunk-index01 ~]# mount /dev/vdc1 /splunk_db
# 将/dev/vdc1分区挂载到/splunk_colddb
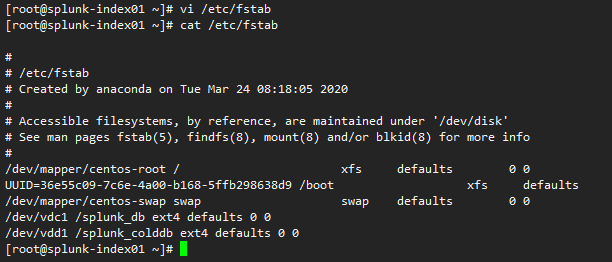
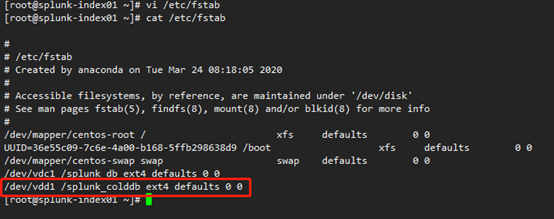
编辑/etc/fstab文件添加以下内容:
/dev/vdc1 /splunk_db ext4 defaults 0 0
[root@splunk-index01 ~]# vim /etc/fstab
[root@splunk-index01 ~]# cat /etc/fstab
#
# /etc/fstab
# Created by anaconda on Tue Mar 24 08:18:05 2020
#
# Accessible filesystems, by reference, are maintained under '/dev/disk'
# See man pages fstab(5), findfs(8), mount(8) and/or blkid(8) for more info
#
/dev/mapper/centos-root /            xfs   defaults    0 0
UUID=36e55c09-7c6e-4a00-b168-5ffb298638d9 /boot          xfs   defaults    0 0
/dev/mapper/centos-swap swap          swap  defaults    0 0
/dev/vdc1 /splunk_db ext4 defaults 0 0
/dev/vdd1 /splunk_colddb ext4 defaults 0 0
[root@splunk-index01 ~]#
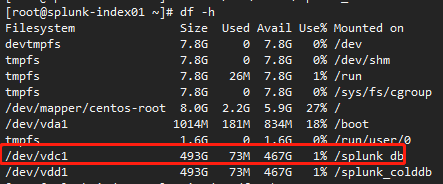
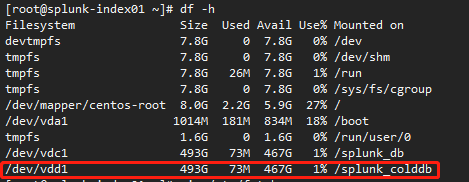
查看磁盘挂载情况
[root@splunk-index01 ~]# df - h
Filesystem        Size Used Avail Use% Mounted on
devtmpfs         7.8G   0 7.8G  0% /dev
tmpfs            7.8G   0 7.8G  0% /dev/shm
tmpfs            7.8G  26M 7.8G  1% /run
tmpfs            7.8G   0 7.8G  0% /sys/fs/cgroup
/dev/mapper/centos-root 8.0G 2.2G 5.9G 27% /
/dev/vda1        1014M 181M 834M 18% /boot
tmpfs            1.6G   0 1.6G  0% /run/user/0
/dev/vdc1        493G  73M 467G  1% /splunk_db
/dev/vdd1        493G  73M 467G  1% /splunk_colddb
挂载vdd磁盘(hdd)到/splunk_colddb
查看磁盘信息
[root@splunk-index01 ~]# fdisk -l
......
Disk /dev/vdc: 536.9 GB, 536870912000 bytes, 1048576000 sectors
Units = sectors of 1 * 512 = 512 bytes
Sector size (logical/physical): 512 bytes / 512 bytes
I/O size (minimum/optimal): 512 bytes / 512 bytes


Disk /dev/vdd: 536.9 GB, 536870912000 bytes, 1048576000 sectors
Units = sectors of 1 * 512 = 512 bytes
Sector size (logical/physical): 512 bytes / 512 bytes
I/O size (minimum/optimal): 512 bytes / 512 bytes
[root@splunk-index01 ~]#
vdc磁盘为SSD磁盘,vdd为hdd磁盘。
给vdd磁盘创建vdd1分区
[root@splunk-index01 ~]# fdisk /dev/vdd # 设置/dev/vdd磁盘
Welcome to fdisk (util-linux 2.23.2).

Changes will remain in memory only, until you decide to write them.
Be careful before using the write command.

Device does not contain a recognized partition table
Building a new DOS disklabel with disk identifier 0x4d8b4ba7.

Command (m for help): n # 新建磁盘分区
Partition type:
  p  primary (0 primary, 0 extended, 4 free)
  e  extended
Select (default p): p # 添加主分区
Partition number (1-4, default 1): 1 # 设置分区号
First sector (2048-1048575999, default 2048): # 设置分区起始大小,默认一直回车
Using default value 2048
Last sector, +sectors or +size{K,M,G} (2048-1048575999, default 1048575999):  # 设置分区结束大小,默认一直回车
Using default value 1048575999
Partition 1 of type Linux and of size 500 GiB is set

Command (m for help): p # 显示分区信息

Disk /dev/vdd: 536.9 GB, 536870912000 bytes, 1048576000 sectors
Units = sectors of 1 * 512 = 512 bytes
Sector size (logical/physical): 512 bytes / 512 bytes
I/O size (minimum/optimal): 512 bytes / 512 bytes
Disk label type: dos
Disk identifier: 0x4d8b4ba7

  Device Boot   Start     End   Blocks  Id System

/dev/vdd1      2048 1048575999  524286976  83 Linux

Command (m for help): w # 保存分区信息并退出

The partition table has been altered!

Calling ioctl() to re-read partition table.
Syncing disks.
[root@splunk-index01 ~]#
查看新区,会生产一个/dev/sdd1的新分区
fdisk -l

对新建磁盘分区进行格式化,分区类型为“ext4”
mkfs -t ext4 /dev/vdd1
挂载vdd磁盘,并设置开机自动挂载
[root@splunk-index01 ~]# mount /dev/vdd1 /splunk_colddb
# 将/dev/vdd1分区挂载到/splunk_colddb
编辑/etc/fstab文件添加以下内容:
/dev/vdd1 /splunk_colddb ext4 defaults 0 0
[root@splunk-index01 ~]# vim /etc/fstab
[root@splunk-index01 ~]# cat /etc/fstab
#
# /etc/fstab
# Created by anaconda on Tue Mar 24 08:18:05 2020
#
# Accessible filesystems, by reference, are maintained under '/dev/disk'
# See man pages fstab(5), findfs(8), mount(8) and/or blkid(8) for more info
#
/dev/mapper/centos-root /            xfs   defaults    0 0
UUID=36e55c09-7c6e-4a00-b168-5ffb298638d9 /boot          xfs   defaults    0 0
/dev/mapper/centos-swap swap          swap  defaults    0 0
/dev/vdc1 /splunk_db ext4 defaults 0 0
/dev/vdd1 /splunk_colddb ext4 defaults 0 0
#
查看磁盘挂载情况
[root@splunk-index01 ~]# df - h
Filesystem        Size Used Avail Use% Mounted on
devtmpfs         7.8G   0 7.8G  0% /dev
tmpfs            7.8G   0 7.8G  0% /dev/shm
tmpfs            7.8G  26M 7.8G  1% /run
tmpfs            7.8G   0 7.8G  0% /sys/fs/cgroup
/dev/mapper/centos-root 8.0G 2.2G 5.9G 27% /
/dev/vda1        1014M 181M 834M 18% /boot
tmpfs            1.6G   0 1.6G  0% /run/user/0
/dev/vdc1        493G  73M 467G  1% /splunk_db
/dev/vdd1        493G  73M 467G  1% /splunk_colddb
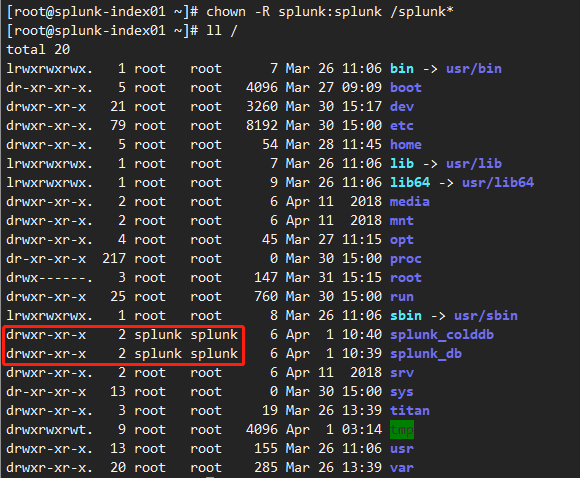
将/splunk_db、/splunk_colddb属主,属组设置成splunk
chown -R splunk:splunk /splunk*
方法二
创建/data数据保存目录
[root@splunk_master opt]# mkdir /data
[root@splunk_master opt]# df -h
Filesystem               Size  Used Avail Use% Mounted on
devtmpfs                 475M     0  475M   0% /dev
tmpfs                    487M     0  487M   0% /dev/shm
tmpfs                    487M  7.5M  479M   2% /run
tmpfs                    487M     0  487M   0% /sys/fs/cgroup
/dev/mapper/centos-root   17G  2.2G   15G  13% /
/dev/sda1               1014M  180M  835M  18% /boot
tmpfs                     98M     0   98M   0% /run/user/0
[root@splunk_master opt]# ll /|grep data
drwxr-xr-x.   2 root root    6 May  4 13:23 data
将/data 目录属主,属组设置成splunk
[root@splunk_master opt]# chown -R splunk:splunk /data/
[root@splunk_master opt]# ll /|grep data
drwxr-xr-x.   2 splunk splunk    6 May  4 13:23 data
[root@splunk_master opt]#
修改系统配置
禁用THP
-
编辑/etc/rc.d/rc.local配置文件,在文件底部添加一下配置
if test -f /sys/kernel/mm/transparent_hugepage/enabled; then echo never > /sys/kernel/mm/transparent_hugepage/enabled fi if test -f /sys/kernel/mm/transparent_hugepage/defrag; then echo never > /sys/kernel/mm/transparent_hugepage/defrag fi -
给/etc/rc.d/rc.local配置文件添加执行权限并执行
[root@splunk-search01 opt]# chmod +x /etc/rc.d/rc.local
[root@splunk-search01 opt]# ll /etc/rc.d/rc.local
-rwxr-xr-x 1 root root 716 Mar 31 16:02 /etc/rc.d/rc.local
[root@splunk-search01 opt]# /etc/rc.d/rc.local
调整操作系统的资源限制
查看操作系统资源限制
[root@exam-Hesc_1 ~]$ ulimit -a
core file size          (blocks, -c) 0
data seg size           (kbytes, -d) unlimited
scheduling priority             (-e) 0
file size               (blocks, -f) unlimited
pending signals                 (-i) 7902
max locked memory       (kbytes, -l) 64
max memory size         (kbytes, -m) unlimited
open files                      (-n) 1024
pipe size            (512 bytes, -p) 8
POSIX message queues     (bytes, -q) 819200
real-time priority              (-r) 0
stack size              (kbytes, -s) 8192
cpu time               (seconds, -t) unlimited
max user processes              (-u) 7902
virtual memory          (kbytes, -v) unlimited
file locks                      (-x) unlimited
修改配置
[root@exam-Hesc_1 ~]$ ulimit -n 64000
[root@exam-Hesc_1 ~]$ ulimit -d unlimited
[root@exam-Hesc_1 ~]$ ulimit -f unlimited
[root@exam-Hesc_1 ~]$ ulimit -u unlimited
[root@exam-Hesc_1 ~]$ ulimit -a
core file size          (blocks, -c) 0
data seg size           (kbytes, -d) unlimited
scheduling priority             (-e) 0
file size               (blocks, -f) unlimited
pending signals                 (-i) 7902
max locked memory       (kbytes, -l) 64
max memory size         (kbytes, -m) unlimited
open files                      (-n) 64000
pipe size            (512 bytes, -p) 8
POSIX message queues     (bytes, -q) 819200
real-time priority              (-r) 0
stack size              (kbytes, -s) 8192
cpu time               (seconds, -t) unlimited
max user processes              (-u) 4096
virtual memory          (kbytes, -v) unlimited
file locks                      (-x) unlimited
[root@exam-Hesc_1 ~]$
修改/etc/security/limits.conf添加以下内容
* hard nofile 64000
* hard nproc 8192
* hard fsize -1
echo "* hard nofile 64000
* hard nproc 8192
* hard fsize -1" >> /etc/security/limits.conf
检查服务器联通性
[root@splunk_master opt]# ping xxx.xxx.xxx.xxx
部署集群
1. 下载Splunk 安装包
cd /opt
wget -o splunk-8.2.6-a6fe1ee8894b-Linux-x86_64.tgz https://download.splunk.com/products/splunk/releases/8.2.6/linux/splunk-8.2.6-a6fe1ee8894b-Linux-x86_64.tgz
2. 安装/启动Splunk
切换至Splunk用户,在各节点服务器上安装Splunk
解压Splunk安装包
[root@splunk_master opt]# tar -zxvf splunk-8.2.6-a6fe1ee8894b-Linux-x86_64.tgz -C /opt
[root@splunk_master opt]# chown -R splunk:splunk splunk
[root@splunk_master opt]# ll
total 539596
drwxr-xr-x. 9 splunk splunk       237 Mar 23 21:36 splunk
-rw-r--r--. 1 root   root   552543435 May  4 13:05 splunk-8.2.6-a6fe1ee8894b-Linux-x86_64.tgz
[root@splunk_master opt]#
启动Splunk服务
[root@splunk_idx01 opt]# su splunk
[splunk@splunk_idx01 opt]$ /opt/splunk/bin/splunk start --accept-license

This appears to be your first time running this version of Splunk.

Splunk software must create an administrator account during startup. Otherwise, you cannot log in.
Create credentials for the administrator account.
Characters do not appear on the screen when you type in credentials.

Please enter an administrator username: admin
Password must contain at least:
   * 8 total printable ASCII character(s).
Please enter a new password:
Please confirm new password:
Copying '/opt/splunk/etc/openldap/ldap.conf.default' to '/opt/splunk/etc/openldap/ldap.conf'.
Generating RSA private key, 2048 bit long modulus
................................+++++
........+++++
e is 65537 (0x10001)
writing RSA key

Generating RSA private key, 2048 bit long modulus
.............................................................+++++
..........................................+++++
e is 65537 (0x10001)
writing RSA key

Moving '/opt/splunk/share/splunk/search_mrsparkle/modules.new' to '/opt/splunk/share/splunk/search_mrsparkle/modules'.

Splunk> Now with more code!

Checking prerequisites...
	Checking http port [8000]: open
	Checking mgmt port [8089]: open
	Checking appserver port [127.0.0.1:8065]: open
	Checking kvstore port [8191]: open
	Checking configuration... Done.
		Creating: /opt/splunk/var/lib/splunk
		Creating: /opt/splunk/var/run/splunk
		Creating: /opt/splunk/var/run/splunk/appserver/i18n
		Creating: /opt/splunk/var/run/splunk/appserver/modules/static/css
		Creating: /opt/splunk/var/run/splunk/upload
		Creating: /opt/splunk/var/run/splunk/search_telemetry
		Creating: /opt/splunk/var/spool/splunk
		Creating: /opt/splunk/var/spool/dirmoncache
		Creating: /opt/splunk/var/lib/splunk/authDb
		Creating: /opt/splunk/var/lib/splunk/hashDb
New certs have been generated in '/opt/splunk/etc/auth'.
	Checking critical directories...	Done
	Checking indexes...
		Validated: _audit _internal _introspection _metrics _metrics_rollup _telemetry _thefishbucket history main summary
	Done
	Checking filesystem compatibility...  Done
	Checking conf files for problems...
	Done
	Checking default conf files for edits...
	Validating installed files against hashes from '/opt/splunk/splunk-8.2.6-a6fe1ee8894b-linux-2.6-x86_64-manifest'
	All installed files intact.
	Done
All preliminary checks passed.

Starting splunk server daemon (splunkd)...
Generating a RSA private key
....+++++
..........................+++++
writing new private key to 'privKeySecure.pem'
-----
Signature ok
subject=/CN=splunk_idx01/O=SplunkUser
Getting CA Private Key
writing RSA key
Done
 [  OK  ]

Waiting for web server at http://127.0.0.1:8000 to be available.......... Done


If you get stuck, we're here to help.
Look for answers here: http://docs.splunk.com

The Splunk web interface is at http://splunk_idx01:8000
设置开机启动
[splunk@splunk_master ~]$ sudo /opt/splunk/bin/splunk enable boot-start
Init script installed at /etc/init.d/splunk.
Init script is configured to run at boot.
修改.bash_profile
编辑~/.bash_profile文件,添加splunk路径配置

[splunk@exam-Hesc_6 opt]$ vim ~/.bash_profile
[splunk@exam-Hesc_6 opt]$ source ~/.bash_profile  # 刷新.bash_profile
[splunk@exam-Hesc_6 opt]$ cat ~/.bash_profile
# .bash_profile

# Get the aliases and functions
if [ -f ~/.bashrc ]; then
	. ~/.bashrc
fi

# User specific environment and startup programs

export SPLUNK_HOME="/opt/splunk"
PATH=$PATH:$HOME/.local/bin:$HOME/bin:$SPLUNK_HOME/bin

export PATH
3. 修改Splunk主机名/服务器名
/opt/splunk/bin/splunk set servername hesc-master
/opt/splunk/bin/splunk set default-hostname hesc-master
4. 初始化集群
在CM环境下运行下列命令
$SPLUNK_HOME/bin/splunk edit cluster-config -mode master -replication_factor 3 -search_factor 2 -secret splunk3du -cluster_label eccom_splunk
$SPLUNK_HOME/bin/splunk restart
[splunk@exam-Hesc_2 opt]$ $SPLUNK_HOME/bin/splunk edit cluster-config -mode master -replication_factor 3 -search_factor 2 -secret splunk3du -cluster_label eccom_splunk
Your session is invalid.  Please login.
Splunk username: admin
Password:
The cluster-config property has been edited.
You need to restart the Splunk Server (splunkd) for your changes to take effect.
[splunk@exam-Hesc_2 opt]$ splunk restart
Stopping splunkd...
Shutting down.  Please wait, as this may take a few minutes.
.. [  OK  ]
Stopping splunk helpers...
 [  OK  ]
Done.

Splunk> Winning the War on Error

Checking prerequisites...
	Checking http port [8000]: open
	Checking mgmt port [8089]: open
	Checking appserver port [127.0.0.1:8065]: open
	Checking kvstore port [8191]: open
	Checking configuration... Done.
	Checking critical directories...	Done
	Checking indexes...
		Validated: _audit _internal _introspection _metrics _metrics_rollup _telemetry _thefishbucket history main summary
	Done
	Checking filesystem compatibility...  Done
	Checking conf files for problems...
	Done
	Checking default conf files for edits...
	Validating installed files against hashes from '/opt/splunk/splunk-8.2.6-a6fe1ee8894b-linux-2.6-x86_64-manifest'
	All installed files intact.
	Done
All preliminary checks passed.

Starting splunk server daemon (splunkd)...
Done
 [  OK  ]

Waiting for web server at http://127.0.0.1:8000 to be available................... Done


If you get stuck, we're here to help.
Look for answers here: http://docs.splunk.com

The Splunk web interface is at http://exam-Hesc_2:8000

[splunk@exam-Hesc_2 opt]$
5. 添加index peer
在每台IDX下运行下列命令
$SPLUNK_HOME/bin/splunk edit cluster-config -mode slave -master_uri https://[CM-ip]:8089 -replication_port 9887 -secret splunk3du
$SPLUNK_HOME/bin/splunk restart
[splunk@exam-Hesc_4 opt]$ $SPLUNK_HOME/bin/splunk edit cluster-config -mode slave -master_uri https://172.30.242.174:8089 -replication_port 9887 -secret splunk3du
Your session is invalid.  Please login.
Splunk username: admin
Password:
The cluster-config property has been edited.
You need to restart the Splunk Server (splunkd) for your changes to take effect.
[splunk@exam-Hesc_4 opt]$ $SPLUNK_HOME/bin/splunk restart
Stopping splunkd...
Shutting down.  Please wait, as this may take a few minutes.
.. [  OK  ]
Stopping splunk helpers...
 [  OK  ]
Done.

Splunk> Winning the War on Error

Checking prerequisites...
	Checking http port [8000]: open
	Checking mgmt port [8089]: open
	Checking appserver port [127.0.0.1:8065]: open
	Checking kvstore port [8191]: open
	Checking configuration... Done.
	Checking critical directories...	Done
	Checking indexes...
		Validated: _audit _internal _introspection _metrics _metrics_rollup _telemetry _thefishbucket history main summary
	Done
	Checking filesystem compatibility...  Done
	Checking conf files for problems...
		Deprecated key in stanza [clustering] in /opt/splunk/etc/system/local/server.conf, line 29: master_uri. This setting is deprecated and might be removed entirely in a future release, use 'manager_uri' instead.
		Your indexes and inputs configurations are not internally consistent. For more information, run 'splunk btool check --debug'
	Done
	Checking default conf files for edits...
	Validating installed files against hashes from '/opt/splunk/splunk-8.2.6-a6fe1ee8894b-linux-2.6-x86_64-manifest'
	All installed files intact.
	Done
	Checking replication_port port [9887]: open
All preliminary checks passed.

Starting splunk server daemon (splunkd)...
Done
 [  OK  ]

Waiting for web server at http://127.0.0.1:8000 to be available.......

WARNING: web interface does not seem to be available!

[splunk@exam-Hesc_4 opt]$
6. 添加search head
$SPLUNK_HOME/bin/splunk edit cluster-config -mode searchhead -master_uri https://[CM-ip]:8089 -secret splunk3du
$SPLUNK_HOME/bin/splunk restart
[splunk@exam-Hesc_1 opt]$ $SPLUNK_HOME/bin/splunk edit cluster-config -mode searchhead -master_uri https://172.30.242.174:8089 -secret splunk3du
Your session is invalid.  Please login.
Splunk username: admin
Password:
The cluster-config property has been edited.
You need to restart the Splunk Server (splunkd) for your changes to take effect.
[splunk@exam-Hesc_1 opt]$ $SPLUNK_HOME/bin/splunk restart
Stopping splunkd...
Shutting down.  Please wait, as this may take a few minutes.
.. [  OK  ]
Stopping splunk helpers...
 [  OK  ]
Done.

Splunk> Winning the War on Error

Checking prerequisites...
	Checking http port [8000]: open
	Checking mgmt port [8089]: open
	Checking appserver port [127.0.0.1:8065]: open
	Checking kvstore port [8191]: open
	Checking configuration... Done.
	Checking critical directories...	Done
	Checking indexes...
		Validated: _audit _internal _introspection _metrics _metrics_rollup _telemetry _thefishbucket history main summary
	Done
	Checking filesystem compatibility...  Done
	Checking conf files for problems...
		Deprecated key in stanza [clustering] in /opt/splunk/etc/system/local/server.conf, line 27: master_uri. This setting is deprecated and might be removed entirely in a future release, use 'manager_uri' instead.
		Your indexes and inputs configurations are not internally consistent. For more information, run 'splunk btool check --debug'
	Done
	Checking default conf files for edits...
	Validating installed files against hashes from '/opt/splunk/splunk-8.2.6-a6fe1ee8894b-linux-2.6-x86_64-manifest'
	All installed files intact.
	Done
All preliminary checks passed.

Starting splunk server daemon (splunkd)...
Done
 [  OK  ]

Waiting for web server at http://127.0.0.1:8000 to be available.................. Done


If you get stuck, we're here to help.
Look for answers here: http://docs.splunk.com

The Splunk web interface is at http://exam-Hesc_1:8000

[splunk@exam-Hesc_1 opt]$
7. 初始化集群配置
上传configbase 至 CM 节点并解压
关闭web,打开9997
复制配置 org_all_indexer_base 到 $SPLUNK_HOME/etc/master-apps/IA_eccom_web 进行修改
设置license master
复制配置 org_full_license_server 到 $SPLUNK_HOME/etc/master-apps/IA_eccom_server_lm 进行修改
初始化indexes,添加volume
复制配置 org_all_indexes 到 $SPLUNK_HOME/etc/master-apps/IA_eccom_indexes 进行修改
开启集群 index discovery功能
编辑配置 $SPLUNK_HOME/etc/system/local/server.conf
在结尾处添加下列内容
[indexer_discovery]
pass4SymmKey = eccomsplunk
下发集群配置
$SPLUNK_HOME/bin/splunk validate cluster-bundle --check-restart
$SPLUNK_HOME/bin/splunk apply cluster-bundle --answer-yes
$SPLUNK_HOME/bin/splunk show cluster-bundle-status
8. 初始化DS配置
- 初始化DS
复制配置 org_all_deploymentclient 到 $SPLUNK_HOME/etc/deployment-apps/IA_eccom_deploymentclient 进行修改,设置deployment-server
- 配置outputs
复制配置 org_all_forwarder_outputs 到 splunk/etc/deployment-apps
修改下列内容
[tcpout]
defaultGroup = eccom
forceTimebasedAutoLB = true
forwardedindex.2.whitelist = (_audit|_introspection|_internal)

[indexer_discovery:eccom]
pass4SymmKey = eccomsplunk
master_uri = https://172.30.242.95:8089

[tcpout:eccom]
indexerDiscovery = eccom
- 配置License Master
cp -r $SPLUNK_HOME/etc/master-apps/IA-eccom-server-lm $SPLUNK_HOME/etc/deployment-apps/
- 下发deployment client初始化配置
在DS的转发器管理页面,新建转发器组进行配置,将以上三个APP进行下发
9. 在SH上配置Deployment Client
将CM中 $SPLUNK/etc/deployment-apps/IA-eccom-deploymentclient 复制到 SH $SPLUNK/etc/app 中
$SPLUNK_HOME/bin/splunk restart
10. 配置MC
- 在MC(CM)上添加search head,如果CM和MC两个角色不在同一台机器,需要监控的节点都需要通过下列命令添加
$SPLUNK_HOME/bin/splunk add search-server https://[SH-ip]:8089 -auth admin:splunk3du -remoteUsername admin -remotePassword splunk3du
- 在MC节点上打开分布式监控,配置角色
附录:集群的维护参考相关命令
Use the CLI to validate the bundle and check restart
https://docs.splunk.com/Documentation/Splunk/latest/Indexer/Updatepeerconfigurations
$SPLUNK_HOME/bin/splunk validate cluster-bundle

$SPLUNK_HOME/bin/splunk validate cluster-bundle --check-restart

$SPLUNK_HOME/bin/splunk show cluster-bundle-status
Use the CLI to apply the bundle
$SPLUNK_HOME/bin/splunk apply cluster-bundle

$SPLUNK_HOME/bin/splunk apply cluster-bundle --answer-yes
Rollback the configuration bundle using the CLI
$SPLUNK_HOME/bin/splunk rollback cluster-bundle
-d2979772834f4346a961b123d2a49447.jpg)


评论区