


Splunk奇巧淫技那些事
0x00 Splunk 数据转发/过滤/处理那些事
A Splunk 将数据转发到第三方系统
工作节点:HF OR Indexer
NO Indexer Cluster流程:
props -> transforms -> outputs
props.conf transforms.conf outputs.conf 确定哪些数据进行数据转发 配置数据转发策略 配置目标ip端口消息
-
outputs.conf# 默认数据转发组 [syslog] defaultGroup = syslogoutputsGroup # 配置syslog数据转发目标地址 [syslog:syslogoutputsGroup] type = udp # 协议 server = 10.203.19.22:514 # 目标ip和端口 -
props.conf# 需要转发的sourcetype名称 [sourcetype::cosmo_syslog] TRANSFORMS-syslog = splunk_syslog_outpust # 需要转发的sourcetype名称 [sourcetype::cosmo_cisco:asa] TRANSFORMS-cisco-asa = splunk_syslog_outpust # 需要转发的sourcetype名称 [sourcetype::cosmo_cisco_asa_anquan] TRANSFORMS-cisco_asa_anquan] = splunk_syslog_outpust -
transforms.conf[splunk_syslog_outpust] REGEX = . DEST_KEY = _SYSLOG_ROUTING FORMAT = syslogoutputsGroup
B Splunk 基于source过滤数据
工作节点:HF OR Indexer
NO Indexer Cluster设置transforms.conf创建过滤数据规则
问题:将普罗米修斯数据接入到splunk系统中发现数据量非常庞大(有1560个指标项),真正使用到的指标项不到100个,需要过滤掉不需要的指标
-
props.conf[prometheus_filter] # prometheus_filter sourcetype 解析规则 TIME_FORMAT = %s%3N TIME_PREFIX = }\s[\d\-\.]+\s NO_BINARY_CHECK = true SHOULD_LINEMERGE = false pulldown_type = 1 category = Metrics EXTRACT-metric_name,num1,num2 = ^(?P<metric_name>[^\{]+)[^\}\n]*\}\s+(?P<num1>[^ ]+)\s+(?P<num2>.+) # 指定transforms.conf 配置内容 TRANSFORMS-set = setnull,conform -
transforms.conf[conform] REGEX = container_cpu_load_average_10s|container_cpu_usage_seconds_total|container_fs_limit_bytes|container_fs_usage_bytes|container_memory_cache|container_memory_usage_bytes|container_memory_working_set_bytes|container_network_receive_bytes_total|container_network_transmit_bytes_total|container_spec_memory_limit_bytes|jvm_gc_collection_seconds_count|jvm_gc_collection_seconds_sum|jvm_memory_bytes_used|jvm_memory_pool_bytes_max|jvm_memory_pool_bytes_used|jvm_threads_current|jvm_threads_deadlocked|jvm_threads_peak|kube_pod_container_status_ready|kube_pod_container_status_running|kube_pod_container_status_terminated|kube_pod_container_status_waiting|machine_cpu_cores|machine_memory_bytes|mysql_global_status_aborted_clients|mysql_global_status_commands_total|mysql_global_status_innodb_data_fsyncs|mysql_global_status_innodb_data_reads|mysql_global_status_innodb_data_writes|mysql_global_status_select_full_join|mysql_global_status_select_scan|mysql_global_status_slow_queries|mysql_global_status_sort_scan|mysql_global_status_threads_connected|mysql_global_status_threads_created|nginx_connections_accepted|nginx_connections_active|nginx_connections_handled|nginx_http_requests_total|node_network_info|rabbitmq_channelsTotal|rabbitmq_connectionsTotal|rabbitmq_consumersTotal|rabbitmq_exchangesTotal|rabbitmq_fd_total|rabbitmq_fd_used|rabbitmq_queue_messages_ready_total|rabbitmq_queue_messages_total|rabbitmq_queue_messages_unacknowledged_total|rabbitmq_queuesTotal|rabbitmq_sockets_total|rabbitmq_sockets_used|rabbitmq_up|redis_blocked_clients|redis_commands_processed_total|redis_connected_clients|redis_evicted_keys_total|redis_expired_keys_total|redis_keyspace_hits_total|redis_keyspace_misses_total|redis_memory_used_bytes|zk_max_latency|zk_num_alive_connections|zk_open_file_descriptor_count|zk_outstanding_requests|zk_up|zk_watch_count|zk_znode_count # 需要采集的数据,通过正则表达式匹配。 # 内容为_raw内容 math(_raw,REGEX) DEST_KEY = queue FORMAT = indexQueue # 转发到索引队列 [setnull] REGEX = . DEST_KEY = queue FORMAT = nullQueue # 传递到nullQueue
C Splunk 基于Host字段过滤数据
实现原理:forwarder采集数据发送到HeavyForwarder上进行解析,由此在HeavyForwarder创建数据过滤规则。
工作节点:HF OR Indexer
NO Indexer Cluster
-
编辑
props.conf使用
SSH工具登录到Heavy Forwarder服务器编辑
/opt/splunk/etc/apps/Splunk_TA_windows/local/props.conf(如文件不存在则新建)。在文件末尾添加以下内容:
[host::example_hostname] # example-hostname 为排除数据的agent主机名 TRANSFORMS-filterhostname = conform,setnull [host::example_ip] # example-IP 为排除数据的agentIP地址 TRANSFORMS-filterIP = conform,setnull -
编辑
transforms.conf编辑
/opt/splunk/etc/apps/Splunk_TA_windows/local/transforms.conf(如文件不存在则新建)。在文件末尾添加以下内容:
[conform] REGEX = . DEST_KEY = queue FORMAT = indexQueue [setnull] # 数据不保存,转发到空消息队列 REGEX = ((\<EventID\>4703\<\/EventID\>)|(EventCode=4703)) DEST_KEY = queue FORMAT = nullQueue -
访问HF refresh web界面刷新配置文件
http://HeavyForwarderIP:8000/zh-CN/debug/refresh
# 需要使用admin账号登入
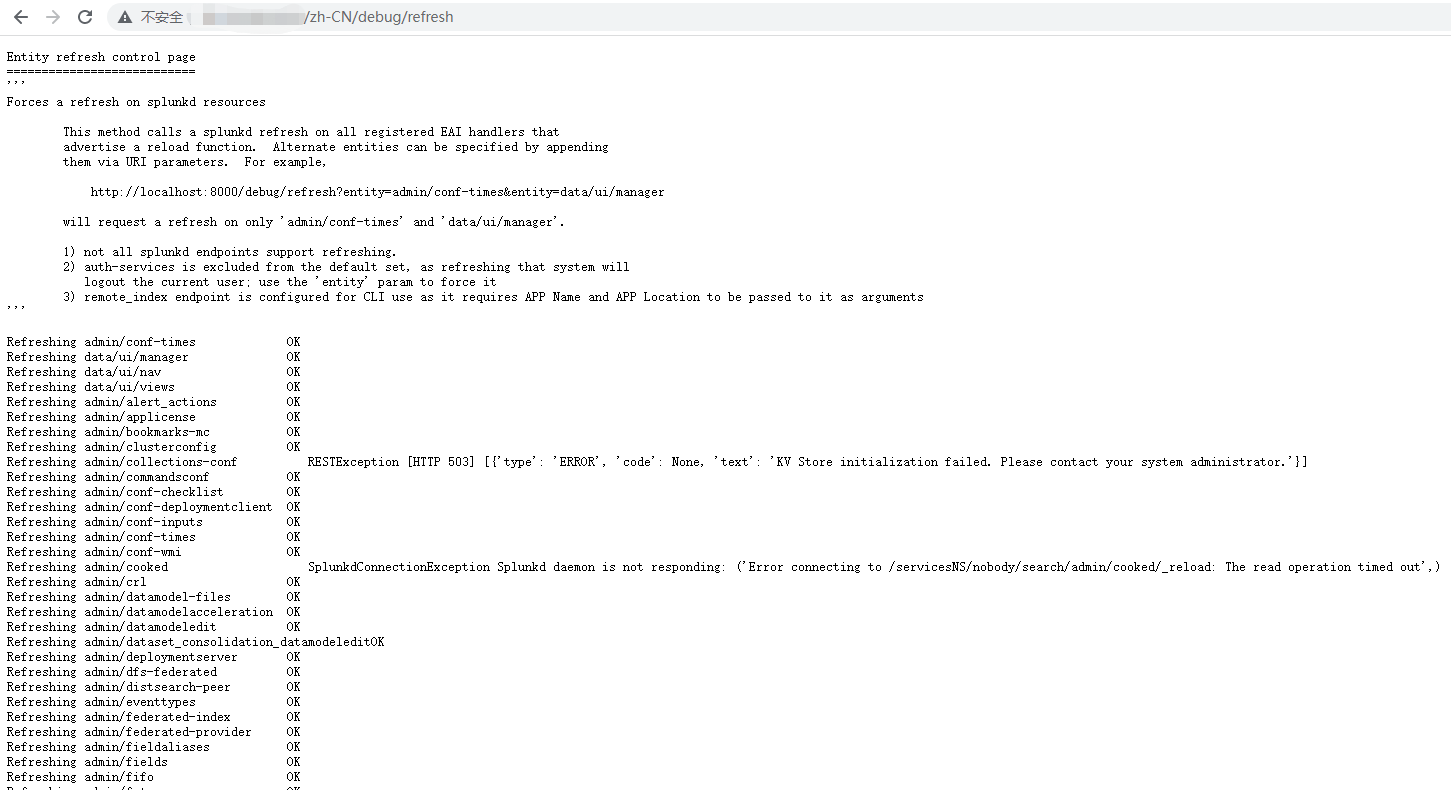
界面如下:
完成效果如下:
D Splunk 数据拆分成不同的sourcetyp
不同种类的网络安全数据全部通过udp 514端口进行数据接收,创建采集配置无法指定多个sourcetype,可以根据source字段进行sourcetype拆分,匹配正则表达式拆分sourcetype
工作节点:HF OR Indexer
NO Indexer Cluster
-
props.conf[source::example_udp:514] SHOULD_LINEMERGE = false TRANSFORMS-changesourcetype = mcafee_ips:syslog,f5_bigip:syslog,asiainfo:tda -
transforms.conf[asiainfo:tda] REGEX = CEF:\d\|(Asiainfo Security|AsiaInfo|Trend Micro)\|(Control Manager|Deep Discovery Analyzer|Deep Security Agent|Deep Security Manager|TDA|Deep Discovery Email Inspector) FORMAT = sourcetype::asiainfo:tda DEST_KEY = MetaData:Sourcetype [f5_bigip:syslog] REGEX = \tASM\:CEF\:\d|F5|ASM FORMAT = sourcetype::f5_bigip:syslog DEST_KEY = MetaData:Sourcetype [mcafee_ips:syslog] REGEX = SyslogAlertForwarder:\s\|\d* FORMAT = sourcetype::mcafee:ips:syslog DEST_KEY = MetaData:Sourcetype
E Splunk 数据转发到多台indexer节点(transforms)
配置文件所在节点即工作节点:HF
-
props.conf[splunktcp] TRANSFORMS-routing = route_all -
outputs.conf# 注意点:不要加defaultGroup配置,否则数据优先给defaultGroup组发送。 # [tcpout] # defaultGroup = idxc_dv # 普通数据转发 [tcpout:mss_idx] disabled = false server = 10.10.0.104:9997 # 索引器发现 [tcpout:idxc_dv] indexerDiscovery = indexer_cluster_discovery [indexer_discovery:indexer_cluster_discovery] # 密码:idx_dv pass4SymmKey = $7$Vys7w3j3T5J1N0u5fr9JYbHGQe5Zh7Hef65c/I4vUOj8THEmBJI= master_uri = https://10.10.0.121:8089补充点:
master节点上面配置索引器发现配置文件:
$SPLUNK_HOME/etc/system/local/server.conf[indexer_discovery] # 密码:idx_dv pass4SymmKey = $7$8OOMpbWXJscp69HifzghTxen+OgyLkvOkf51+1ioUDf0cyCjfRw= polling_rate = 10 indexerWeightByDiskCapacity = false -
transforms.conf[route_all] REGEX=(.) DEST_KEY=_TCP_ROUTING FORMAT=idxc_dv,mss_idx
F Splunk 数据转发到多台indexer节点(inputs)
用于转发HF节点采集syslog落盘数据
工作节点:HF
-
outputs.conf[tcpout:mss_idxc] server=server1:9997,server2:9997 [tcpout:local_idxc] server=server3:9997,server4:9997 # 注意点:不要加defaultGroup配置,否则不生效 # [tcpout] # defaultGroup = primary_indexers -
inputs.conf[monitor://.../file1.log] _TCP_ROUTING = local_idxc [monitor://.../file2.log] _TCP_ROUTING = mss_idxc [monitor://.../file3.log] _TCP_ROUTING = local_idxc,mss_idxc # 也可以配置多个outputs转发
0x01 SplunkUF修改8089端口(管理端口)
A 修改web.conf配置文件
查看/opt/splunkforwarder/etc/system/local/web.conf文件是否存在
[root@linux_mysql local]# ll /opt/splunkforwarder/etc/system/local/
web.conf
-rw-r--r--. 1 root root 52101 Jul  4 00:07 /opt/splunkforwarder/etc/system/local/web.conf
[root@linux_mysql local]#
如果web.conf文件不存在将…/default/下面的web.conf 复制到local目录下
cd /opt/splunkforwarder/etc/system/local/
cp ../default/web.conf .
找到mgmtHostPort配置项并修改
#   Version 7.2.5
# DO NOT EDIT THIS FILE!
# Changes to default files will be lost on update and are difficult to
# manage and support.
#
# Please make any changes to system defaults by overriding them in
# apps or $SPLUNK_HOME/etc/system/local
# (See "Configuration file precedence" in the web documentation).
#
# To override a specific setting, copy the name of the stanza and
# setting to the file where you wish to override it.
#
# This file contains possible attributes and values you can use to configure Splunk's web interface.
#
[default]

[settings]

# enable/disable the appserver
startwebserver = 1

# port number tag is missing or 0 the server will NOT start an http listener
# this is the port used for both SSL and non-SSL (we only have 1 port now).
httpport = 8000

# this determines whether to start SplunkWeb in http or https.
enableSplunkWebSSL = false

# location of splunkd; don't include http[s]:// in this anymore.
#mgmtHostPort = 127.0.0.1:8089--此项配置
mgmtHostPort = 127.0.0.1:8099

# list of ports to start python application servers on (although usually
# one port is enough)  Set to 0 to instead run the application server
# directly as the web front end on 'httpport', separate from splunkd.
appServerPorts = 8065

# default timeout, in seconds, when communicating with splunkd
splunkdConnectionTimeout = 30

# enable/disable custom netloc when using http client
enableSplunkWebClientNetloc = False

# SSL certificate files.
privKeyPath = $SPLUNK_HOME/etc/auth/splunkweb/privkey.pem
serverCert = $SPLUNK_HOME/etc/auth/splunkweb/cert.pem
B 重启splunkforwarder服务
/opt/splunkforwarder/bin/splunk start
C 查看端口是否修改成功
ps -ef|grep splunk
[root@linux_mysql local]# ps -ef|grep splunk
root       7698      1  0 00:10 ?        00:00:01 splunkd --under-systemd --systemd-delegate=yes -p 8099 _internal_launch_under_systemd
root       7723   7698  0 00:10 ?        00:00:00 [splunkd pid=7698] splunkd --under-systemd --systemd-delegate=yes -p 8099 _internal_launch_under_systemd [process-runner]
root       7949   5126  0 00:28 pts/0    00:00:00 grep --color=auto splunk
[root@linux_mysql local]#
0x02 Splunk_TA_nix不能执行CPU.sh问题
问题:Splunk_TA_nix add-on下发到Linux Centos7系统上没有采集到cpu性能数据,发现缺少相关命令需要在linux系统上安装以下命令
yum install sysstat
yum install sar
yum insatll mpstat
0x03 SplunkUF系统克隆导致主机名和GUID相同
A 方式一
删除 /etc/instance.cfg (里面记录了guid,也就是客户端名称)
删除 server.conf里面的实例名称记录,inputs.conf里面的主机名称记录
重启 forwarder服务
B 方式二
重新安装SplunkUniversalForwarder
# 例如: 安装目录为/tpdata
/tpdata/splunkforwarder/bin/splunk stop
rm -rf  /tpdata/splunkforwarder
tar zxvf /tpdata/splunkforwarder-6*.tgz -C /tpdata
/tpdata/splunkforwarder/bin/splunk start --answer-yes --no-prompt --accept-license
/tpdata/splunkforwarder/bin/splunk set deploy-poll 10.21.8.228:8089 -auth admin:changeme
/tpdata/splunkforwarder/bin/splunk restart
C 方法三
基于splunk clone-prep-clear-config命令清除splunk配置信息创建Linux和Windows脚本
提示:不能修改脚本名称,查找进程是否运行使用Splunk关键字进行查找
linux:clear-Splunkforwarder-config.sh
#!/bin/sh
#
# Time    : 2022/01/12 22:41:30
# Author  : Hesc
# Version : 1.0

# Splunkforwarder安装路径
Splunkforwarder_DIR="/opt"
# Splunkforwarder PID
Splunkforwarder_PID=`ps -ef|grep splunk | grep -v grep | awk '{print $2}'`

if [ -n "$Splunkforwarder_PID" ]; then
    echo -e "\033[42;30mINFO: Splunkforwarder guid info:\033[0m"
    cat $Splunkforwarder_DIR/splunkforwarder/etc/instance.cfg
    echo -e "\033[41;30mERROR: Splunkforwarder is runing, Stop Splunkforwarder!\033[0m"
    $Splunkforwarder_DIR/splunkforwarder/bin/splunk stop  # 停止splunkforwarder服务
    echo -e "\033[42;30mINFO: clear Splunkforwarder config!\033[0m"
    $Splunkforwarder_DIR/splunkforwarder/bin/splunk clone-prep-clear-config  # 清除splunkforwarder配置
    echo -e "\033[42;30mINFO: Start Splunkforwarder\033[0m"
    $Splunkforwarder_DIR/splunkforwarder/bin/splunk start  # 启动splunkforwarder服务
    echo -e "\033[42;30mINFO: Update Splunkforwarder guid info:\033[0m"
    cat $Splunkforwarder_DIR/splunkforwarder/etc/instance.cfg
else
    echo -e "\033[42;30mINFO: Splunkforwarder guid info:\033[0m"
    cat $Splunkforwarder_DIR/splunkforwarder/etc/instance.cfg
    echo -e "\033[42;30mINFO: Splunkforwarder is not runing, clear Splunkforwarder config!\033[0m"
    $Splunkforwarder_DIR/splunkforwarder/bin/splunk clone-prep-clear-config  # 清除splunkforwarder配置
    echo -e "\033[42;30mINFO: Start Splunkforwarder\033[0m"
    $Splunkforwarder_DIR/splunkforwarder/bin/splunk start  # 启动splunkforwarder服务
    echo -e "\033[42;30mINFO: Update Splunkforwarder guid info:\033[0m"
    cat $Splunkforwarder_DIR/splunkforwarder/etc/instance.cfg
fi
Windows:clear-Splunkforwarder-config.bat
@echo off

:: Time    : 2022/01/12 22:41:30
:: Author  : Hesc
:: Version : 1.0

set SplunkUniversalForwarder_install_dir="C:\Program Files"

tasklist|find /i "splunkd.exe"
if %errorlevel%==0 (
	echo "ERROR: SplunkUniversalForwarder is runing,Stop SplunkUniversalForwarder !!"
	"C:\Program Files\SplunkUniversalForwarder\bin\splunk.exe" stop
	"C:\Program Files\SplunkUniversalForwarder\bin\splunk.exe" clone-prep-clear-config
	"C:\Program Files\SplunkUniversalForwarder\bin\splunk.exe" start
) else (
	echo "INFO: SplunkUniversalForwarder is not runing,clear SplunkUniversalForwarder config !!"
	"C:\Program Files\SplunkUniversalForwarder\bin\splunk.exe" clone-prep-clear-config
	"C:\Program Files\SplunkUniversalForwarder\bin\splunk.exe" start
)

pause
0x04 修改每个CPU的最大并发搜索次数
vim /opt/splunk/system/local/limits.conf
cat /opt/splunk/system/local/limits.conf

[search]
max_searches_per_cpu = 1 # 默认值为1
# 每个CPU的最大并发搜索次数
0x05 关于Splunk 重启日志也会存放在index里面
index="_internal" source="/opt/splunk/var/log/splunk/splunkd.log" start
0x06 查看告警邮箱是否发送
INFO:为正常发送,ERROR:为发送失败  >>要检查ERROR报错的问题
index ="_internal" source="/opt/splunk/var/log/splunk/python.log" "mail"
0x07 关于字段重命名注意点
字段重命名:不能设置多个字段名称重命名为同一个字段名称
重写字段值:如果有设置多个字段名称重命名为同一个字段名称,使用勾选此选项字段重命名。
0x08 仪表板设置隐藏图表(并传递传递参数)
<row>
    <panel> depends="$range$"
        <table>
            <title>僵尸进程详情</title>
        </table>
    </panel>
</row>
0x09 Splunk web刷新配置文件url
http://192.168.10.9:8000/zh-CN/debug/refresh
0x0a 修改index存放路径
A 修改splunk-launch.conf配置文件
] vim /opt/splunk/splunk/etc/splunk-launch.conf
--编辑splunk-launch文件
] cat /opt/splunk/splunk/etc/splunk-launch.conf
#   Version 7.2.5

# Modify the following line to suit the location of your Splunk install.
# If unset, Splunk will use the parent of the directory containing the splunk
# CLI executable.
#
# SPLUNK_HOME=/opt/splunk-home
# By default, Splunk stores its indexes under SPLUNK_HOME in the
# var/lib/splunk subdirectory.  This can be overridden
# here:
# SPLUNK_DB=/opt/splunk-home/var/lib/splunk
# 添加以下内容
SPLUNK_DB=/opt/splunk/splunk/data

# Splunkd daemon name
SPLUNK_SERVER_NAME=Splunkd

# Splunkweb daemon name
SPLUNK_WEB_NAME=splunkweb

# If SPLUNK_OS_USER is set, then Splunk service will only start
# if the 'splunk [re]start [splunkd]' command is invoked by a user who
# is, or can effectively become via setuid(2), $SPLUNK_OS_USER.
# (This setting can be specified as username or as UID.)
# SPLUNK_OS_USER
B 创建数据保存目录
] mkdir data
--创建data目录
] splunk stop
--停止splunk服务
] mv /opt/splunk/splunk/var/lib/splunk /opt/splunk/splunk/data/
--将/opt/splunk/splunk/var/lib/splunk目录下的文件移动到/opt/splunk/splunk/data/目录下
] splunk start
--启动服务
0x0b Splunk License 文件保存路径
$SPLUNK_HOME/etc/licenses/enterprise/Splunk.License.lic
0x0c outputlookup小技巧
index=wineventlog
| lookup AXA_Server_List Segment as 源网络地址 OUTPUT 分公司区域 机构 省份 Region
| search Region=*
| stats count by 分公司区域 省份 Region 源网络地址 username
| search username!="-" username !="ANONYMOUS LOGON" username!=admin*
| rename 源网络地址 as IP username as nt_host
| rex field=nt_host "(?P<nt_host>[^$]*)"
| eval nt_host=upper(nt_host)
| lookup AXA_ServerIP_List.csv IP nt_host OUTPUT IP as ip
| search NOT ip=*
| fields - ip count
| outputlookup AXA_ServerIP_List.csv append=true
0x0d 创建UF资产表SPL
index="_internal" sourcetype="splunkd" source="*metrics.log" fwdType=uf source="/opt/splunk/var/log/splunk/metrics.log"
| stats count by hostname,sourceIp,os,arch,guid
0x0e Splunk enterprise security CLI安装命令
curl -k -u admin:Eccom@123 https://localhost:8089/services/apps/local -d filename="true" -d name="/opt/splunk-enterprise-security_700.spl" -d update="true" -v
0x0f Splunk 修改密码
A Splunk 7.1以下版本修改admin密码
如果忘记管理员密码,可以重置。需要有服务器的访问权限。
方法
1.将\$SPLUNK_HOME/etc/passwd文件重命名为passwd.bak
] mv /opt/splunk/etc/passwd passwd.bak
2.重新启动Splunk,此时登录Splunk Web之后,所使用的密码则为初始账号密码:admin changeme
] /opt/splunk/bin/splunk restatr
B Splunk 7.1以上版本修改admin密码
如果您使用的是Splunk 7.1以上的版本,需要使用<user-seed.conf 创建管理员凭据>方法重置admin密码。
在7.1以前的版本中,缺少$SPLUNK_HOME/etc/passwd文件, Splunk会将密码重置为"changeme"。但是在7.1上版本此方法已失效。
1. 您需要保存$SPLUNK_HOME/etc/passwd文件,并删除原始文件。
mv $SPLUNK_HOME/etc/passwd $SPLUNK_HOME/etc/passwd-bak
2.编辑$SPLUNK_HOME/etc/system/local/user-seed.conf配置文件(不存在则新建)。
添加一个名为[user_info]章节,并指定管理员用户和您希望使用的密码。
[user_info]
USERNAME=admin
PASSWORD=password
3.然后重新启动Splunk,将会生成一个新的$SPLUNK_HOME/etc/passwd文件。
splunk restart
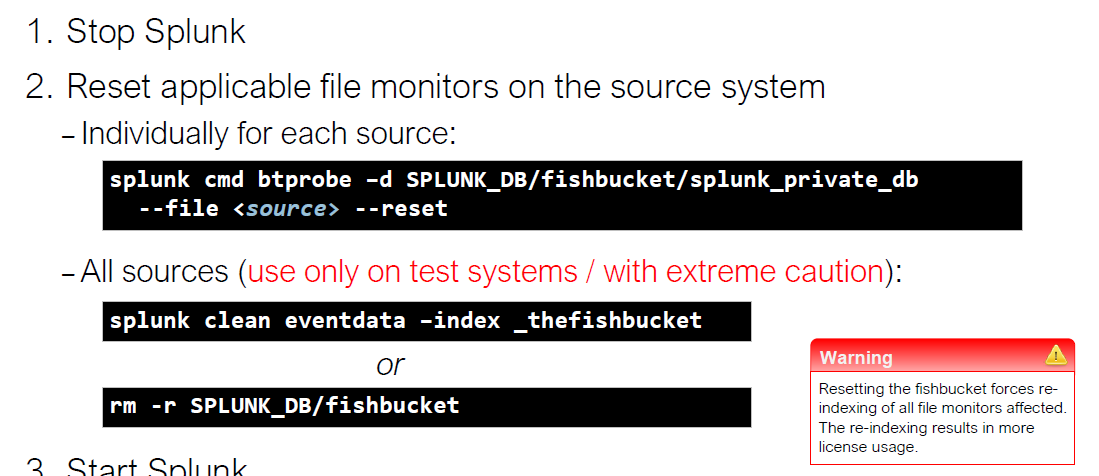
0x0G 重新索引数据
-d2979772834f4346a961b123d2a49447.jpg)


评论区